RVC Real-Time Voice Conversion: Live Streaming and Communication Setup
Set up RVC for real-time voice conversion in live streaming and voice chat. Low-latency configuration, audio routing, and practical implementation guides.
Make AI images and video in your browser
Characters, video, photo packs. No GPU, no setup. Your first generation is free.
Real-time voice conversion transforms how streamers, VTubers, and content creators present themselves vocally. RVC's ability to convert voices live opens creative possibilities from anime character voices to celebrity impressions, all happening in real-time as you speak. The challenge lies in achieving low enough latency that conversations feel natural while maintaining voice quality.
Setting up RVC for real-time use requires understanding audio routing, latency optimization, and the technical requirements for smooth live performance. This guide covers the complete setup from initial configuration to production-ready streaming integration.
Quick Answer: Real-time RVC requires a capable GPU (RTX 3060+ recommended), proper audio routing through virtual audio cables, and optimized settings for low latency. Expect 50-150ms total latency with proper configuration, acceptable for streaming but noticeable in direct conversation. Use RVC WebUI's real-time mode or dedicated real-time interfaces like W-Okada's voice changer.
:::tip[Key Takeaways]
- RVC Real-Time Voice Conversion: Live Streaming and Communication Setup represents an important development in its field
- Multiple approaches exist depending on your goals
- Staying informed helps you make better decisions
- Hands-on experience is the best way to learn :::
- Real-time RVC setup and configuration
- Audio routing for streaming
- Latency optimization techniques
- Integration with streaming software
- Troubleshooting common issues
Real-Time RVC Options
Several tools enable real-time voice conversion with RVC models. Each has different strengths and trade-offs.
W-Okada Voice Changer
The most popular dedicated real-time RVC solution:
Advantages:
- Purpose-built for real-time use
- Excellent latency optimization
- GPU and CPU fallback options
- Active development and support
- Cross-platform availability
Requirements:
- Windows or Mac (Linux with effort)
- GPU recommended (RTX series ideal)
- Virtual audio cable software
- RVC-compatible voice models
RVC WebUI Real-Time Mode
The standard RVC interface includes real-time capabilities:
Advantages:
- Uses existing RVC setup
- Familiar interface if already using RVC
- Access to all RVC features
- Good for testing before dedicated solutions
Limitations:
- Higher latency than dedicated tools
- More resource-intensive
- Interface not optimized for live use
SteamVR / VRChat Integration
For VR content creators:
Advantages:
- Direct VR application integration
- Works with VRChat and similar platforms
- Avatar voice matching
Considerations:
- VR-specific setup requirements
- Additional latency considerations
- Limited to VR contexts
Hardware Requirements
GPU Recommendations
Real-time processing demands GPU power:
Minimum viable:
- RTX 3060 or equivalent
- 8GB VRAM
- Current drivers
Recommended:
- RTX 3070 or better
- 10GB+ VRAM
- Dedicated to voice processing
Optimal:
- RTX 4080/4090
- Maximum VRAM
- Lowest possible latency
CPU fallback exists but introduces significant latency.
Audio Hardware
Quality audio chain matters:
Microphone:
- Low-noise condenser or dynamic
- Consistent positioning
- Pop filter for plosives
- Minimal room noise
Audio interface:
- Low-latency ASIO support
- Reliable drivers
- Appropriate for your mic type
Monitoring:
- Low-latency monitoring option
- Comfortable for extended use
- Feedback-proof setup
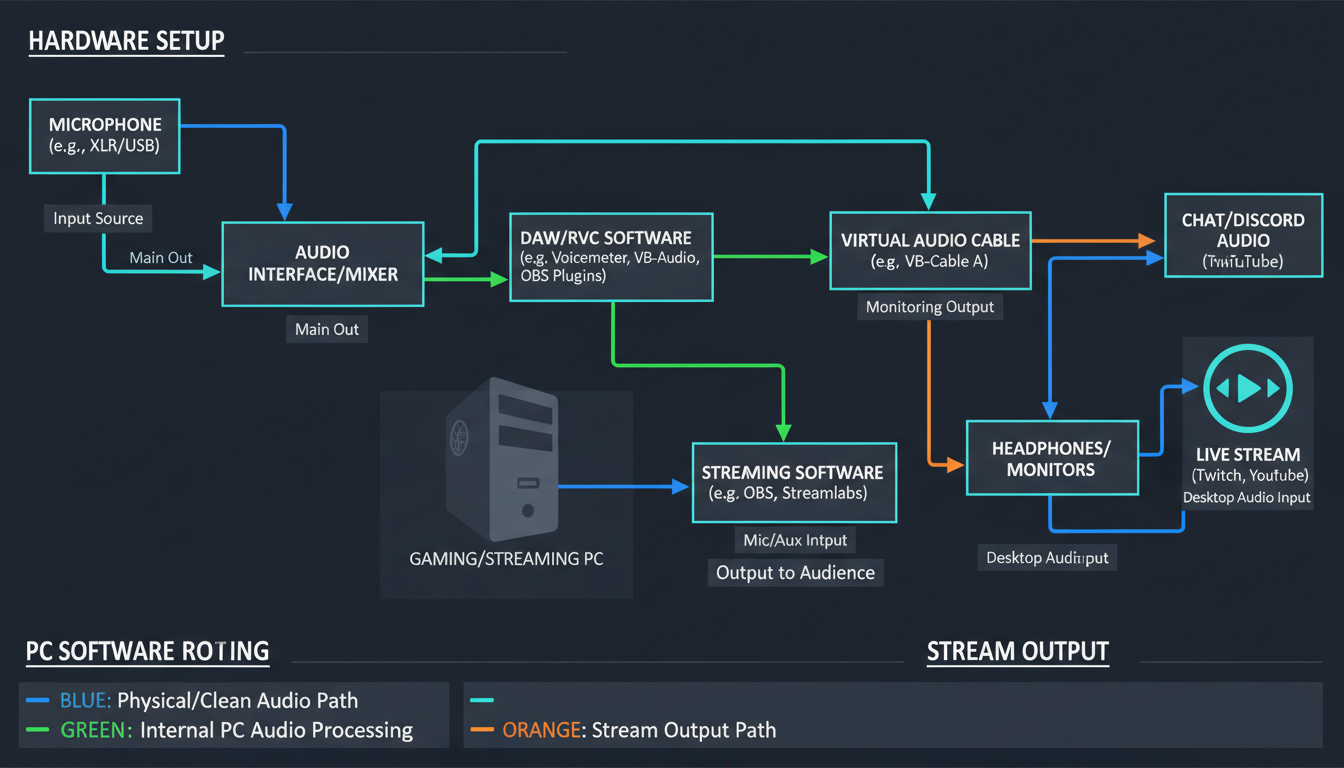
Audio Routing Setup
Virtual Audio Cables
Software audio routing is essential:
VB-Audio Virtual Cable:
- Free for basic use
- Windows standard
- Reliable and simple
- Multiple cable support available
VoiceMeeter:
- Advanced routing options
- Multiple virtual inputs/outputs
- Built-in mixing capabilities
- Free (donationware)
BlackHole (Mac):
Free ComfyUI Workflows
Find free, open-source ComfyUI workflows for techniques in this article. Open source is strong.
- macOS virtual audio
- Open source
- Low latency
- Simple to configure
Routing Path
The typical audio path for real-time RVC:
Microphone → Audio Interface → Virtual Cable Input → RVC → Virtual Cable Output → Streaming Software/Chat Application
Each step adds potential latency, so minimize unnecessary processing.
Configuration Steps
Windows setup with VB-Cable:
- Install VB-Audio Virtual Cable
- Set microphone as default recording device
- Configure RVC to output to CABLE Input (VB-Audio)
- Set streaming software to use CABLE Output as mic source
- Test routing before going live
VoiceMeeter advanced setup:
- Install VoiceMeeter (Potato for most features)
- Route physical mic to Hardware Input 1
- Route to Virtual Output B1
- Configure RVC to use B1 as input
- Route RVC output to Virtual Input
- Send to Virtual Output for streaming software
RVC Real-Time Configuration
W-Okada Setup
Step-by-step configuration:
Initial setup:
- Download W-Okada Voice Changer
- Extract to dedicated folder
- Download required models (Hugging Face)
- Launch the application
Audio configuration:
- Select input device (virtual cable or direct mic)
- Select output device (virtual cable for routing)
- Set sample rate (48000Hz recommended)
- Configure buffer size (lower = less latency, more CPU)
Model loading:
- Import RVC model (.pth file)
- Load corresponding index file if available
- Set pitch shift if needed
- Configure protect settings
Optimization:
- Start with moderate buffer size
- Test latency with monitoring
- Reduce buffer if stable
- Find minimum stable configuration
Latency Settings
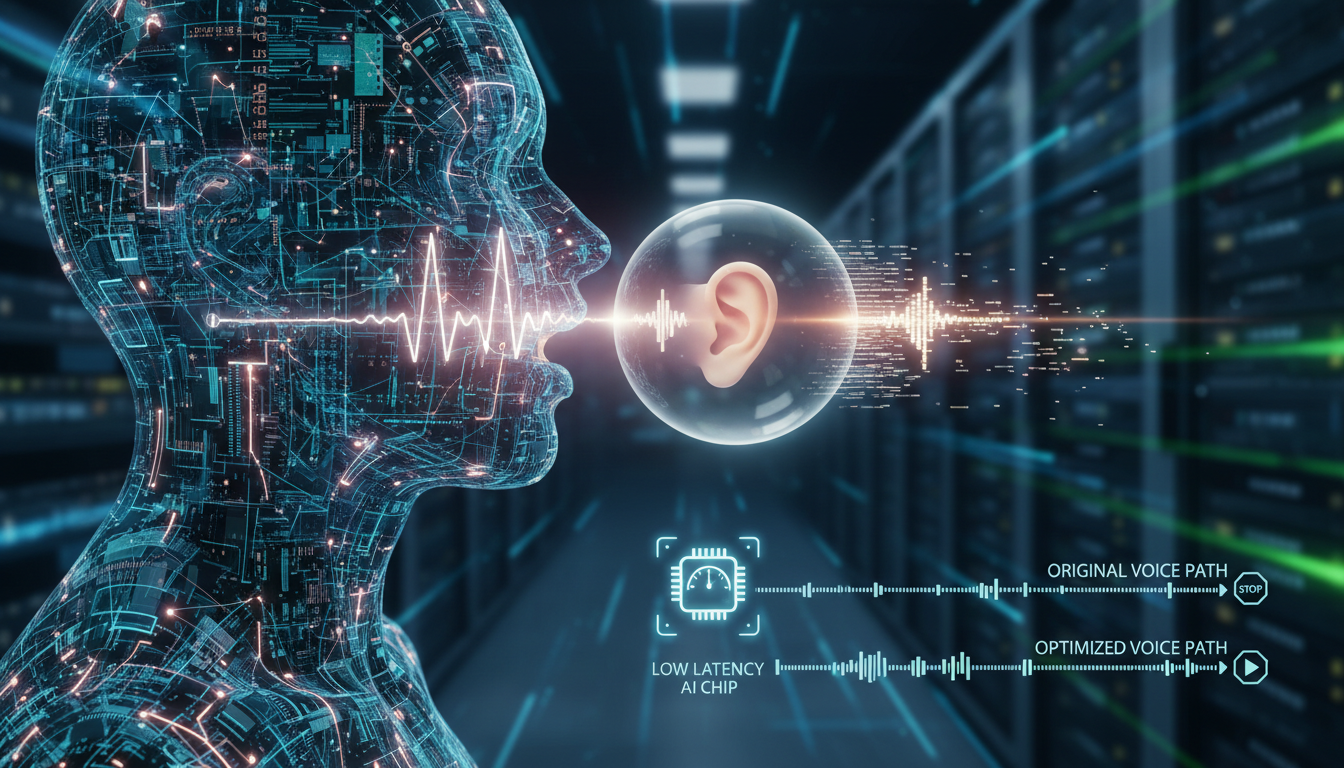
Understanding latency components:
Input buffer: Collects audio before processing Processing time: GPU/CPU conversion time Output buffer: Smooths output audio Total latency: Sum of all components
Want to skip the complexity? Apatero gives you professional AI results instantly with no technical setup required.
Optimal settings for streaming:
- Total latency: 80-120ms acceptable
- Buffer size: 512-1024 samples
- Processing: GPU-accelerated
Optimal settings for conversation:
- Target under 80ms if possible
- Smaller buffers, more CPU demand
- May require high-end hardware
Streaming Integration
OBS Configuration
Setting up OBS for RVC voice:
Audio source setup:
- Add Audio Input Capture source
- Select virtual cable output (RVC output)
- Apply any desired filters (noise gate, compression)
- Position in mixer
Monitoring:
- Enable monitoring for RVC source
- Use "Monitor and Output" mode
- Route monitoring to headphones
- Verify no feedback loops
Filters to consider:
- Noise suppression: Light, RVC may introduce artifacts
- Compressor: Even out volume variations
- Limiter: Prevent clipping
- Gate: Remove silence noise
StreamLabs Integration
Similar process for StreamLabs:
- Access audio settings
- Add microphone source pointing to virtual cable
- Configure mixer levels
- Test before streaming
Discord/Voice Chat
For live voice chat use:
Discord setup:
- Settings → Voice & Video
- Input Device: Virtual cable output
- Disable Discord's voice processing
- Test in voice channel
Latency considerations:
- Voice chat is more latency-sensitive
- Target lowest stable latency
- Inform conversation partners of slight delay
- Consider if delay is acceptable for use case
Optimization Techniques
Reducing Latency
Every millisecond matters for real-time:
Earn Up To $1,250+/Month Creating Content
Join our exclusive creator affiliate program. Get paid per viral video based on performance. Create content in your style with full creative freedom.
Hardware level:
- GPU upgrade if bottlenecked
- ASIO audio drivers
- Dedicated audio interface
- Close unnecessary applications
Software level:
- Reduce buffer sizes
- Disable unused features
- Optimize model settings
- Use hardware acceleration
Configuration level:
- Match sample rates throughout chain
- Minimize routing hops
- Disable unnecessary audio effects
- Keep processing pipeline simple
Quality vs Latency
Trade-offs to consider:
Lower latency (higher quality sacrifice):
- Smaller buffer sizes
- Less processing
- Potential audio glitches
- More CPU/GPU demand
Higher quality (more latency):
- Larger buffer sizes
- More stable audio
- Better conversion quality
- Less demanding on hardware
Find the balance appropriate for your use case.
Monitoring Strategy
Check performance continuously:
CPU usage: Should stay under 80% GPU usage: Monitor for bottlenecks Audio buffer: Watch for underruns Latency measurement: Use tools to verify actual delay
Troubleshooting
Audio Glitches
Symptoms: Crackling, popping, dropouts
Solutions:
- Increase buffer size
- Close competing applications
- Check driver updates
- Verify sample rate matching
- Reduce other audio processing
High Latency
Symptoms: Noticeable delay, conversation difficulty
Solutions:
- Decrease buffer size (if stable)
- Upgrade GPU
- Simplify audio routing
- Disable unnecessary features
- Use optimized models
Voice Quality Issues
Symptoms: Robotic sound, artifacts, pitch problems
Solutions:
- Adjust protect settings
- Verify model compatibility
- Check input audio quality
- Reduce pitch shift amount
- Try different models
Feedback Loops
Symptoms: Echo, squealing, loop sounds
Solutions:
- Use headphones, not speakers
- Check monitoring routing
- Verify input/output separation
- Disable system audio monitoring
Frequently Asked Questions
Can I use RVC real-time for gaming voice chat?
Yes, but latency may affect gameplay communication. Test with your specific games and chat applications.
What's the minimum GPU for real-time RVC?
RTX 3060 is minimum recommended. CPU fallback works but with significant latency increase.
How do I reduce latency below 50ms?
Very difficult. Requires high-end GPU, optimized settings, minimal routing, and may sacrifice stability.
Can I use multiple RVC voices simultaneously?
Possible with multiple instances but multiplies resource requirements. Generally not practical.
Does real-time RVC work on Mac?
Yes, with M1/M2 chips providing good performance. W-Okada has Mac support.
How do I hide the conversion process from viewers?
The conversion is audio-only, not visible. Just ensure your audio routing is correct.
Can I apply RVC to other people's voices in calls?
Technically possible but ethically problematic and potentially illegal. Don't do this without creative consent.
What models work best for real-time?
Smaller, well-trained models perform better. Test multiple models to find balance of quality and speed.
Conclusion
Real-time RVC transforms live content creation by enabling consistent voice characters during streams and calls. While setup requires careful attention to audio routing and latency optimization, the results enable creative possibilities previously requiring expensive voice actors or complex post-production.
Start with dedicated tools like W-Okada Voice Changer, optimize for your hardware capabilities, and thoroughly test before going live. The technology continues improving, with latency and quality gains in each major update.
For RVC model training, see our dataset preparation guide. For audio quality optimization, check our quality optimization guide.
Make AI images and video in your browser
Characters, video, photo packs. No GPU, no setup. Your first generation is free.
Related Articles
Adobe Firefly vs Midjourney vs Ideogram 2026: Which Wins
Brand-safe licensing, scroll-stopping aesthetics, or text rendering. Three tools optimized for three different jobs, tested against real briefs.

AI Architecture Rendering 2026: Veras vs Paintit vs Midjourney
44 percent of architects use AI in 2026. Veras, Paintit, ArchiVinci, and Midjourney tested on five real architectural briefs from a working studio.
AI Art Market Statistics 2025: Industry Size, Trends, and Growth Projections
Comprehensive AI art market statistics including market size, creator earnings, platform data, and growth projections with 75+ data points.