AI Image Editor: Remove Objects, Inpaint, and Extend Images Like a Pro in 2026
Master AI image editing with object removal, inpainting, and outpainting. Learn the best AI photo editors for erasing unwanted elements and extending images beyond borders.
Make AI images and video in your browser
Characters, video, photo packs. No GPU, no setup. Your first generation is free.
Last month I was editing a client's product shoot and there was a power cord running right through the middle of the hero shot. In the old days, I would have spent 20 minutes with the clone stamp in Photoshop, carefully matching textures and hoping nobody noticed the repeating pattern artifacts. Instead, I painted over the cord with a mask in an AI image editor, hit generate, and the cord vanished in about four seconds. The floor texture, the shadow gradients, the subtle reflections. All perfectly reconstructed. That moment still catches me off guard even after using these tools for over a year.
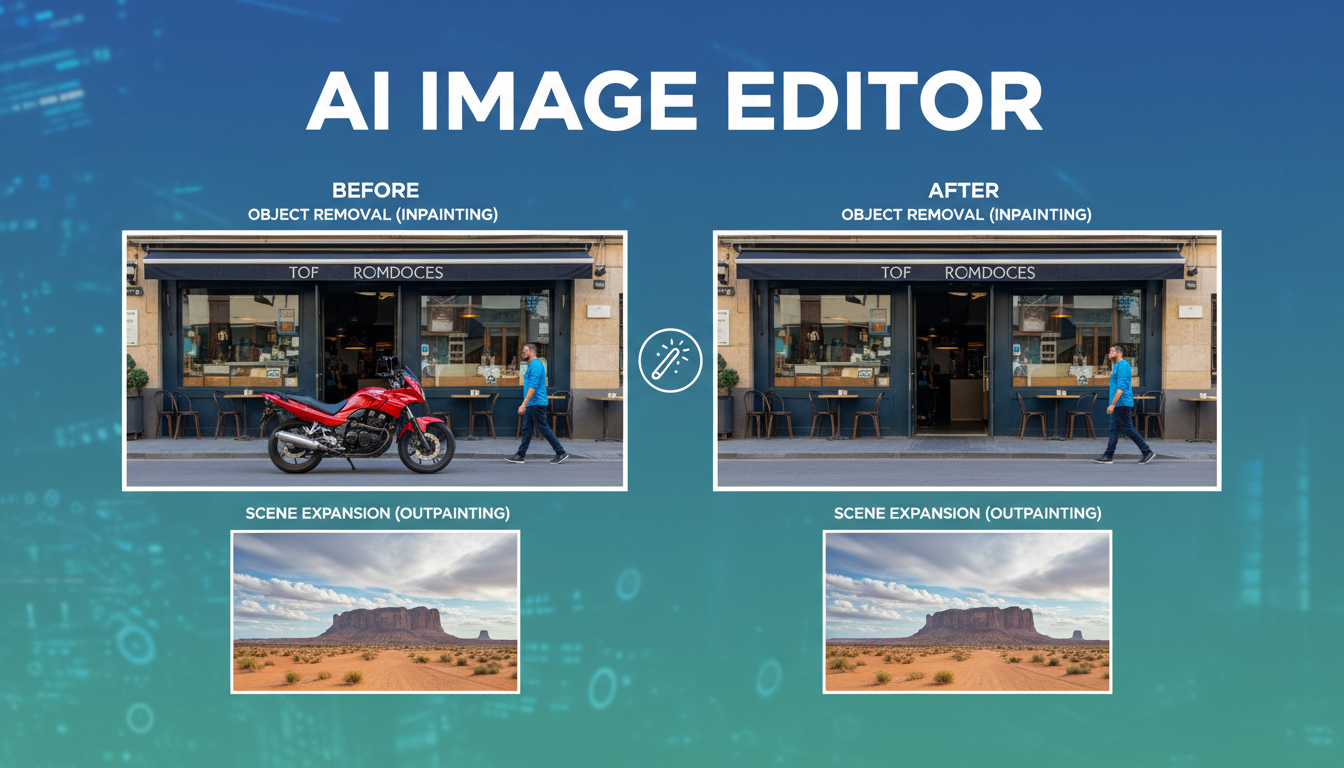
AI-powered image editing has fundamentally changed what's possible for photographers, designers, marketers, and anyone who works with images. The three core capabilities that matter most are object removal, inpainting (filling in masked regions with contextually appropriate content), and outpainting (extending an image beyond its original borders). These features used to require serious Photoshop expertise and hours of manual work. Now they take seconds.
Quick Answer: The best AI image editor tools in 2026 are Adobe Firefly (integrated into Photoshop's generative fill), Stable Diffusion with ControlNet for advanced users, and IOPaint for a free open-source option. For quick object removal, Samsung and Google's built-in phone erasers work surprisingly well. Apatero provides accessible cloud-based AI editing workflows that combine these capabilities without requiring local GPU hardware.
- Object removal AI can erase people, wires, signs, and clutter from photos in seconds with near-perfect results
- Inpainting fills masked areas with contextually generated content, not just blurred copies of surrounding pixels
- Outpainting extends images beyond their borders, which is incredibly useful for fixing aspect ratios and adding composition space
- Free tools like IOPaint and LaMa handle most use cases. Paid tools add convenience and integration
- The quality gap between AI editing and manual Photoshop work has nearly closed for common tasks
- Phone-based AI erasers (Google Magic Eraser, Samsung Object Eraser) handle quick fixes without any desktop software
What Is AI Image Editing and Why Does It Matter?
Traditional image editing tools work with pixels directly. You clone pixels from one area to another, you blur boundaries, you manually paint in replacement content. The results depend entirely on the skill of the editor, and even experts leave artifacts. AI image editing takes a fundamentally different approach. Instead of copying pixels, these tools understand the semantic content of your image. They know what a "floor" looks like, what a "sky" should contain, how shadows should fall based on light direction.
This distinction matters because it means AI editing is contextually aware. When you remove a person from a beach photo, the AI doesn't just smear the surrounding sand into the gap. It generates new sand with the correct texture gradient, adds appropriate wave patterns if the person was near the water, and even handles the shadow that person was casting. The results are often indistinguishable from a photo that never had anyone in it.
I started taking AI-powered editing seriously in early 2025 when I noticed the output quality from Stable Diffusion's inpainting had crossed a threshold. Before that, the results were obviously AI-generated if you looked closely. Weird texture swimming, color shifts at mask boundaries, sometimes completely hallucinated objects appearing where you removed something. But the current generation of models, particularly SDXL inpainting and Flux-based variants, produces results that I genuinely cannot distinguish from the original photo content even when I zoom to 200%.
The practical impact is massive. Real estate photographers clean up cluttered rooms in minutes instead of hours. E-commerce teams remove unwanted reflections and stickers from product shots. Social media managers fix composition issues by extending images to fit different aspect ratios. And ordinary people simply erase that stranger who walked into their vacation photo.
How AI Object Removal Actually Works
Understanding the technology helps you get better results, so let me walk through what happens when you tell an AI to remove something from your photo. The process involves two main stages.
First, the system needs to identify what you want removed. Some tools use automatic detection (you tap on an object and it detects the boundaries), while others require you to paint a mask manually. The mask defines the region that needs to be regenerated. Getting the mask right is probably the single most important factor in getting good results.
Second, the AI model generates replacement content for the masked region. Modern tools use diffusion models that have been trained on millions of images. They understand the statistical relationships between pixels at a deep level. The model considers the surrounding context, the color palette, the texture patterns, the lighting direction, and the semantic meaning of the scene to generate content that belongs there.
Here's what makes this technically impressive. The model isn't searching a database for a matching patch of sky or grass to paste in. It's synthesizing entirely new pixel data that is consistent with the surrounding image. Every generation is unique. If you run the same removal twice, you'll get slightly different but equally valid results.
Best Tools for AI Object Removal
After testing dozens of options, here are the tools that consistently deliver the best results for removing unwanted objects from photos.
Desktop and Professional Tools:
- Adobe Photoshop with Generative Fill. The integration is seamless, and Adobe's Firefly model handles complex removals well. The main downside is the subscription cost.
- Stable Diffusion (SDXL or Flux inpainting models). Best results when properly configured, completely free, but requires some technical setup. I run this through ComfyUI for batch processing.
- IOPaint (formerly LaMa Cleaner). Free, open-source, runs locally. The LaMa model handles simple removals perfectly. For complex scenes, you can plug in Stable Diffusion as the backend.
- Topaz Photo AI. Includes a solid object removal feature alongside its upscaling and denoising capabilities.
Mobile Tools:
- Google Magic Eraser (Pixel phones, Google Photos). Surprisingly good for quick fixes. I use it constantly for removing photobombers.
- Samsung Object Eraser. Built into Samsung's gallery app. Handles simple removals well.
- TouchRetouch. A dedicated mobile app that's been doing this since before AI, now with AI-powered capabilities.
Online Tools:
- Cleanup.pictures. Free web-based tool powered by LaMa. Great for quick, simple removals.
- Apatero. Provides cloud-based AI editing workflows including object removal without needing local hardware.
- Canva's Magic Eraser. Available in Canva Pro. Good enough for social media content.
For a broader look at AI-powered photo tools, check out my guide on AI photo tools for transforming and enhancing images.
Mastering AI Inpainting for Erase and Replace
Object removal is really just one application of a broader capability called inpainting. When you remove an object, the AI inpaints the background. But inpainting can do much more than just fill in gaps. You can use it to replace objects with something entirely different, change textures and materials, modify facial expressions, swap seasons in a landscape, and basically rewrite any part of your image while keeping the rest intact.
This is where the real creative power lives. I was working on a real estate listing last year where the homeowner had bright orange walls in the living room. Rather than suggesting they repaint before the shoot, I masked the walls and inpainted them with a neutral warm gray. The result looked completely natural, with proper shadow casting on the new wall color and even subtle texture variation that matched the original plaster surface. The listing photos looked like a professionally staged home.
Text-Guided Inpainting vs. Context-Only Inpainting
There are two main approaches to inpainting, and understanding the difference will dramatically improve your results.
Context-only inpainting uses models like LaMa that simply fill the masked region based on surrounding visual context. No text prompt needed. You mask an area, and the model figures out what should go there. This works brilliantly for removing objects where you just want the background to continue naturally. It's fast, lightweight, and produces very clean results for simple removals.
Text-guided inpainting uses diffusion models (Stable Diffusion, DALL-E, Firefly) where you provide a text prompt describing what should appear in the masked region. This is what powers features like Photoshop's Generative Fill and is necessary when you want to replace an object with something specific. Instead of just filling with background, you can write "a red ceramic vase with dried flowers" and get exactly that, perfectly lit and composited into your scene.
My hot take here: text-guided inpainting is overhyped for most practical editing tasks. About 80% of the time, what people actually need is context-only removal, which is faster and more reliable. Text-guided replacement is amazing for creative work, but for the everyday "get that thing out of my photo" use case, simpler models like LaMa produce cleaner results with fewer artifacts. I've seen too many people fire up Stable Diffusion to remove a trash can from a photo when Cleanup.pictures would have done it in two seconds with better results.
Tips for Better Inpainting Results
Getting consistently good results from AI inpainting comes down to a few key practices that I've learned through extensive trial and error.
Mask generously. Your mask should extend slightly beyond the object you're removing. Include some of the surrounding area so the model has room to blend. A mask that's too tight will leave visible edges.
Pay attention to shadows. The most common tell that something was removed from a photo is a missing shadow. Make sure your mask covers the object's shadow too, or the result will look uncanny.
Use appropriate denoising strength. In Stable Diffusion, the denoising strength controls how much the model changes the masked region. For removals, use 0.7-0.85. For replacements, use 0.85-1.0. Too low and the original object bleeds through. Too high and you lose coherence with the surrounding image.
Free ComfyUI Workflows
Find free, open-source ComfyUI workflows for techniques in this article. Open source is strong.
Match the resolution. If your image is 4000x3000 and you're inpainting a small region, the model is working at its native resolution on just that region. For Stable Diffusion, that usually means 512x512 or 1024x1024. If your inpainting region is much larger than the model's native resolution, the results will be less coherent.
Run multiple generations. AI generation has inherent randomness. If the first result isn't perfect, generate three or four more with different seeds. Usually at least one will be excellent.
For more on AI-powered background work, see my article on AI background remover and generator tools.
AI Outpainting: Extending Images Beyond Their Borders
Outpainting is, in my opinion, one of the most underappreciated AI editing capabilities available today. The concept is simple. You take an existing image and extend it in any direction, and the AI generates new content that seamlessly continues the scene. The practical applications are surprisingly broad.
I shoot a lot of content for social media, and different platforms require different aspect ratios. Instagram wants 4:5 for feed posts, Stories need 9:16, Twitter prefers 16:9, and LinkedIn works best with roughly 1.91:1. Instead of cropping (and losing important content) or awkwardly adding letterboxing, I outpaint the image to fill whatever aspect ratio I need. The AI extends the sky upward, continues the background outward, and generates floor or ground texture below. The result looks like the photo was originally shot at that wider angle.
Here's a concrete example. I had a portrait shot in vertical orientation (3:4) that I needed for a blog post header in 16:9 landscape format. The subject was centered, so cropping to 16:9 would have cut off their head. Instead, I outpainted both sides, and the AI generated a continuation of the office background. Bookshelves that matched the style of the existing ones, consistent lighting, even a plant that looked like it belonged in the scene. Nobody would ever know the original photo was a different aspect ratio.
Best Tools for AI Outpainting
Not every AI image editor handles outpainting equally well. Here are the tools that I've found produce the most consistent results.
- Adobe Photoshop Generative Expand. The gold standard for outpainting right now. Expand the canvas in Photoshop, select the empty area, and Generative Fill handles the rest. The integration with Photoshop's traditional tools makes it easy to clean up any imperfections.
- Stable Diffusion (ComfyUI or Automatic1111). Offers the most control over outpainting with adjustable parameters. The "poor man's outpainting" and "outpainting mk2" scripts in A1111 work well, and ComfyUI workflows offer even more flexibility.
- DALL-E (through ChatGPT or API). OpenAI's outpainting is solid, especially for artistic or stylized images. The conversational interface makes it easy to iterate.
- Midjourney (Vary Region + Pan). The pan feature extends images directionally, and the results tend to be very aesthetically pleasing, though you sacrifice some control.
Another hot take: outpainting is going to become a standard part of every camera app within two years. Apple and Google are already moving in this direction with their computational photography features. The idea of a fixed frame that captures exactly what the lens sees will start to feel limiting once people realize AI can plausibly extend any scene. Imagine taking a photo and then deciding afterward that you wanted a wider angle. That's not science fiction. It works today, and it's only getting better.
Free AI Photo Editor Options Worth Trying
You don't need to spend money to access genuinely capable AI image editing. The open-source community has built remarkable tools that rival commercial offerings for many use cases.
IOPaint is my top recommendation for anyone who wants a free, local AI image editor. It started as a simple frontend for the LaMa inpainting model, but it has grown into a full-featured editing tool. You can use it with multiple backends, including LaMa for quick removals, Stable Diffusion for text-guided edits, and various other models. The interface runs in your browser, and the whole thing is self-contained. I use it as my daily driver for quick edits when I don't want to open Photoshop.
Stable Diffusion with ComfyUI offers the most powerful free editing pipeline, but the learning curve is steep. If you're willing to invest time in learning ComfyUI's node-based workflow system, you can build custom inpainting and outpainting workflows that produce professional-grade results. The community has shared thousands of workflows on platforms like CivitAI and OpenArt, so you don't need to build everything from scratch.
Want to skip the complexity? Apatero gives you professional AI results instantly with no technical setup required.
GIMP with AI plugins is worth mentioning for anyone already in the GIMP ecosystem. Several plugins add AI-powered inpainting to GIMP's workflow, including Stable GIMP and various community scripts that connect GIMP to local Stable Diffusion installations.
For mobile users, Google Photos includes Magic Eraser for free on Pixel phones and as part of Google One subscriptions. It handles casual object removal perfectly well, and I find myself using it more than any desktop tool for quick social media cleanup.
If you're interested in enhancing image quality alongside editing, check out my guide on AI image upscalers for enhancing photos to 4K.
Real-World AI Editing Workflows That Actually Work
Theory is great, but let me share some practical workflows I use regularly. These combine multiple tools for results that no single tool achieves alone.
Product Photography Cleanup
For e-commerce product shots, I follow a consistent pipeline. First, I shoot the product on a simple surface with reasonable lighting. Don't stress about perfection. Then I use an AI background remover to isolate the product. Next, I run the image through an AI image editor to clean up any reflections, dust spots, or imperfections on the product itself. Finally, I place the product on a generated background that matches the brand aesthetic, using inpainting to ensure the lighting and shadows are consistent.
This workflow lets me produce studio-quality product images with a phone camera and a desk lamp. I processed 45 products for a client last month using this pipeline, and the results were indistinguishable from a professional product shoot that would have cost thousands of dollars.
Real Estate Photo Enhancement
Real estate photos need to look inviting without being misleading. My workflow involves removing personal items (family photos, medicine bottles, toiletries) using object removal, then using inpainting to fix any visible damage or wear that would distract from the space. I never add things that aren't there or make rooms look larger than they are. That crosses an ethical line. But cleaning up clutter and removing distracting elements is standard practice that buyers actually appreciate.
One thing I've learned the hard way is that AI removal tools struggle with mirrors and glass. If there's a mirror in the shot reflecting the object you're trying to remove, you need to remove the reflection separately. The AI doesn't automatically understand that the reflection and the object are related. This caught me off guard on my first real estate project when I removed a coat rack but left its reflection perfectly visible in a hallway mirror.
Social Media Content Repurposing
Here's where outpainting really shines. I create content in one master format (usually 1:1 square for maximum flexibility) and then outpaint to every platform's required dimensions. This means I get 4-5 perfectly formatted versions of every image without cropping anything important. The AI fills in the extra space with contextually appropriate content, and each version looks like it was intentionally composed for that platform.
How AI Image Editors Compare to Traditional Photoshop
I still use Photoshop. Let me be clear about that. But the balance of when I use Photoshop versus when I use AI tools has shifted dramatically. Here's an honest comparison.
AI editors win at:
Earn Up To $1,250+/Month Creating Content
Join our exclusive creator affiliate program. Get paid per viral video based on performance. Create content in your style with full creative freedom.
- Removing unwanted objects (faster and often better than clone stamp)
- Extending canvas size (outpainting is something Photoshop couldn't do at all before Generative Fill)
- Generating replacement content (text-guided inpainting is a new capability)
- Speed on routine edits (what took 20 minutes now takes 30 seconds)
- Accessibility (no learning curve for basic tasks)
Photoshop still wins at:
- Precision masking and compositing (AI masks are good but not pixel-perfect)
- Color grading and tonal adjustments (AI doesn't handle this well yet)
- Text and graphic overlay (obviously)
- Batch processing with specific parameters (Actions are still king)
- Non-destructive editing workflows (layers, smart objects, adjustment layers)
My third hot take: the distinction between "AI editing" and "traditional editing" will disappear within 18 months. Adobe is integrating AI into every Photoshop feature, and standalone AI tools are adding traditional editing features. By 2027, every image editor will be an AI image editor, and we'll stop qualifying it. The question won't be "should I use AI?" but "which AI model powers the editor I prefer?"
Common Mistakes When Using AI Image Editors
After working with these tools extensively and helping others learn them, I see the same mistakes repeatedly. Avoiding these will save you significant frustration.
Masking too tightly. New users draw their masks right along the edge of the object they want to remove. This almost always leaves a visible halo or edge artifact. Extend your mask 5-10 pixels beyond the object boundary. The AI needs that buffer zone to create a seamless transition.
Ignoring context and lighting. When using text-guided inpainting to add or replace objects, people often describe what they want without considering the existing scene. If your photo has warm afternoon lighting, and you inpaint "a modern chair," the chair might appear with neutral studio lighting and look completely out of place. Add lighting descriptions to your prompts.
Over-editing. Just because you can remove everything doesn't mean you should. I've seen people remove so many elements from a photo that the result looks eerily empty and sterile. Restraint produces more believable results.
Using the wrong tool for the job. Complex scene editing with multiple overlapping removals is better handled in Stable Diffusion with careful masking. Quick single-object removals are better handled by LaMa-based tools. Matching the tool to the task complexity saves time and produces better results.
Not checking at full resolution. AI-edited regions often look perfect at social media resolution but fall apart when you zoom in. Always check your edits at 100% zoom before using them for print or large-format display.
For guidance on choosing the right AI tool for image generation tasks, see my comparison of the best AI image generators in 2026.
The Ethics of AI Photo Manipulation
I want to address this briefly because it matters. AI image editing makes photo manipulation trivially easy, and that comes with responsibility. Removing a stranger from your vacation photo is fine. Removing evidence of damage from a photo being used for an insurance claim is fraud. The technology is neutral. The ethics depend entirely on context and intent.
Platforms like Apatero are building transparency features that help track AI edits, which I think is a healthy direction for the industry. We need norms around disclosure, especially in journalism, real estate, and advertising. My personal rule is simple. If the edit would change someone's decision (to buy a product, rent an apartment, believe a news story), it should be disclosed. If it's purely aesthetic cleanup that doesn't affect the substance, disclosure isn't necessary but should be available if asked.
What's Coming Next for AI Image Editing
The current capabilities are impressive, but we're still in the early stages. Here's what I expect to see in the remainder of 2026 and into 2027.
Video inpainting at real-time speed. Object removal in video already works but is slow and inconsistent across frames. Models like ProPainter are improving rapidly, and I expect real-time video inpainting to become standard in editing software within a year.
3D-aware editing. Current AI editors work in 2D. They don't truly understand the 3D structure of a scene. Upcoming models that combine neural radiance fields (NeRFs) with inpainting will produce dramatically better results, especially for complex removals where perspective matters.
Instruction-based editing. Instead of manually masking areas and writing prompts, you'll simply tell the AI what you want in plain language. "Remove the car parked on the left" or "make the sky look like sunset." Models like InstructPix2Pix already demonstrate this, and the quality is improving rapidly.
Integrated workflows. The future isn't separate tools for removal, inpainting, and outpainting. It's unified AI editing assistants that understand your entire editing intent and execute multi-step edits automatically. You'll describe the final result you want, and the AI will figure out the optimal sequence of operations.
Frequently Asked Questions
What is the best free AI image editor for removing objects from photos?
IOPaint (formerly LaMa Cleaner) is the best free option for most users. It runs locally on your computer, supports multiple AI backends including LaMa and Stable Diffusion, and produces professional-quality results. For quick mobile use, Google Magic Eraser is excellent if you have a Pixel phone or Google One subscription.
Can AI really remove a person from a photo without leaving traces?
Yes, modern AI removal tools handle person removal very well, especially when the person doesn't overlap with other important subjects. The AI reconstructs the background behind the person, including ground textures, shadows, and any partially occluded objects. Results are nearly flawless in outdoor scenes and well-lit indoor environments. Complex scenes with multiple overlapping people are more challenging but still achievable with careful masking.
What is the difference between inpainting and outpainting?
Inpainting fills in or replaces content within the existing boundaries of an image. You mask an area inside the image, and the AI generates replacement content. Outpainting extends the image beyond its original borders, generating entirely new content that continues the scene. Both use similar underlying technology (diffusion models), but outpainting requires the model to imagine content that was never captured by the camera.
Is AI image editing replacing Photoshop?
Not entirely, but it's changing how Photoshop is used. Adobe has integrated AI capabilities directly into Photoshop through Generative Fill and Generative Expand. For routine tasks like object removal and canvas extension, AI is faster and often better than manual Photoshop techniques. However, Photoshop remains superior for precision compositing, color grading, and complex multi-layer editing workflows.
How much does AI image editing cost?
Many capable tools are completely free. IOPaint, Stable Diffusion, and Cleanup.pictures handle most editing tasks without any cost. Google Magic Eraser is free on Pixel phones. For professional tools, Adobe Photoshop with Generative Fill requires a Creative Cloud subscription (around $23/month). Cloud-based services like Apatero offer competitive pricing for users who want powerful editing without local GPU requirements. Dedicated mobile apps like TouchRetouch cost around $2-5 as a one-time purchase.
Can AI extend an image to a different aspect ratio?
Absolutely. This is one of the most practical uses of AI outpainting. You can take a portrait-oriented photo (3:4) and extend it to landscape (16:9) for a blog header, or take a square image and extend it vertically for an Instagram Story (9:16). The AI generates new content on the extended sides that matches the style, lighting, and content of the original image.
What resolution can AI image editors work with?
Most AI inpainting models natively operate at resolutions between 512x512 and 1024x1024 pixels. However, modern implementations use tiled processing that allows them to work on images of any resolution. For high-resolution images, the AI processes the edit region at its native resolution and then composites the result back into the full-resolution image. Some tools, particularly those using SDXL models, produce cleaner results at higher native resolutions.
Are AI photo edits detectable?
With current technology, well-executed AI edits are extremely difficult to detect visually. However, forensic tools that analyze pixel-level statistics, compression artifacts, and noise patterns can sometimes identify AI-modified regions. As AI editing improves, detection becomes harder. For professional contexts where authenticity matters, maintaining original files and documenting edits is good practice.
What hardware do I need to run AI image editing locally?
For LaMa-based tools (IOPaint with default settings), almost any modern computer works, including laptops without dedicated GPUs. For Stable Diffusion-based inpainting and outpainting, you'll want an NVIDIA GPU with at least 8GB of VRAM (GTX 1070 or better). Apple Silicon Macs (M1 and later) can also run Stable Diffusion through Core ML or MPS backends, though processing is slower than on dedicated NVIDIA GPUs.
How do I get the best results when removing large objects from photos?
For large object removal, work in stages rather than trying to remove everything at once. First, remove the main object with a generous mask. Then clean up any artifacts from the first pass with a second, more targeted removal. Use a denoising strength of 0.75-0.85 in Stable Diffusion to balance between coherence and completeness. For very large removals (more than 30% of the image area), consider using text-guided inpainting with a description of what the background should look like, as context-only models may struggle without enough surrounding information to work from.
Make AI images and video in your browser
Characters, video, photo packs. No GPU, no setup. Your first generation is free.
Related Articles
Adobe Firefly vs Midjourney vs Ideogram 2026: Which Wins
Brand-safe licensing, scroll-stopping aesthetics, or text rendering. Three tools optimized for three different jobs, tested against real briefs.

AI Architecture Rendering 2026: Veras vs Paintit vs Midjourney
44 percent of architects use AI in 2026. Veras, Paintit, ArchiVinci, and Midjourney tested on five real architectural briefs from a working studio.
AI Art Market Statistics 2025: Industry Size, Trends, and Growth Projections
Comprehensive AI art market statistics including market size, creator earnings, platform data, and growth projections with 75+ data points.