Learn Stable Diffusion for Animation: Complete 2025 Guide
Master AI animation with Stable Diffusion. From AnimateDiff to Deforum, learn every technique for creating smooth AI-generated videos and GIFs.
Make AI images and video in your browser
Characters, video, photo packs. No GPU, no setup. Your first generation is free.
When I first tried making animations with Stable Diffusion back in 2023, the results were... let's say educational. Flickering frames, characters morphing between shots, backgrounds that refused to stay consistent. I nearly gave up. Fast forward to today, and I'm producing smooth, professional-looking animations regularly. The tools have evolved dramatically, and so has my understanding of them.
Quick Answer: Stable Diffusion animation works by generating sequences of related images with controlled variation between frames. The main tools are AnimateDiff for direct animation, Deforum for motion effects, and video-to-video workflows for transforming existing footage. With proper settings, you can achieve broadcast-quality results.
- AnimateDiff is the easiest path to smooth SD animations
- ControlNet provides essential frame-to-frame consistency
- LCM LoRA speeds up generation by 3x with minimal quality loss
- Video-to-video transforms existing footage into AI art styles
- Flickering is the #1 problem to solve, and there are proven solutions
Why Animate With Stable Diffusion?
Here's the thing. Traditional animation is insanely labor-intensive. Even a 30-second clip requires hundreds of hand-drawn or rendered frames. Professional studios spend months on what AI can approximate in hours.
I'm not saying AI replaces animators. That's a lazy take. What I am saying is that AI opens animation to people who never had access before. Solo creators, small studios, hobbyists with stories to tell. The democratization is real and exciting.
Plus, SD animation has a distinctive aesthetic. It's not trying to be Pixar or Disney. It has its own visual language that I find genuinely compelling when done well.
The Animation Ecosystem: Understanding Your Options
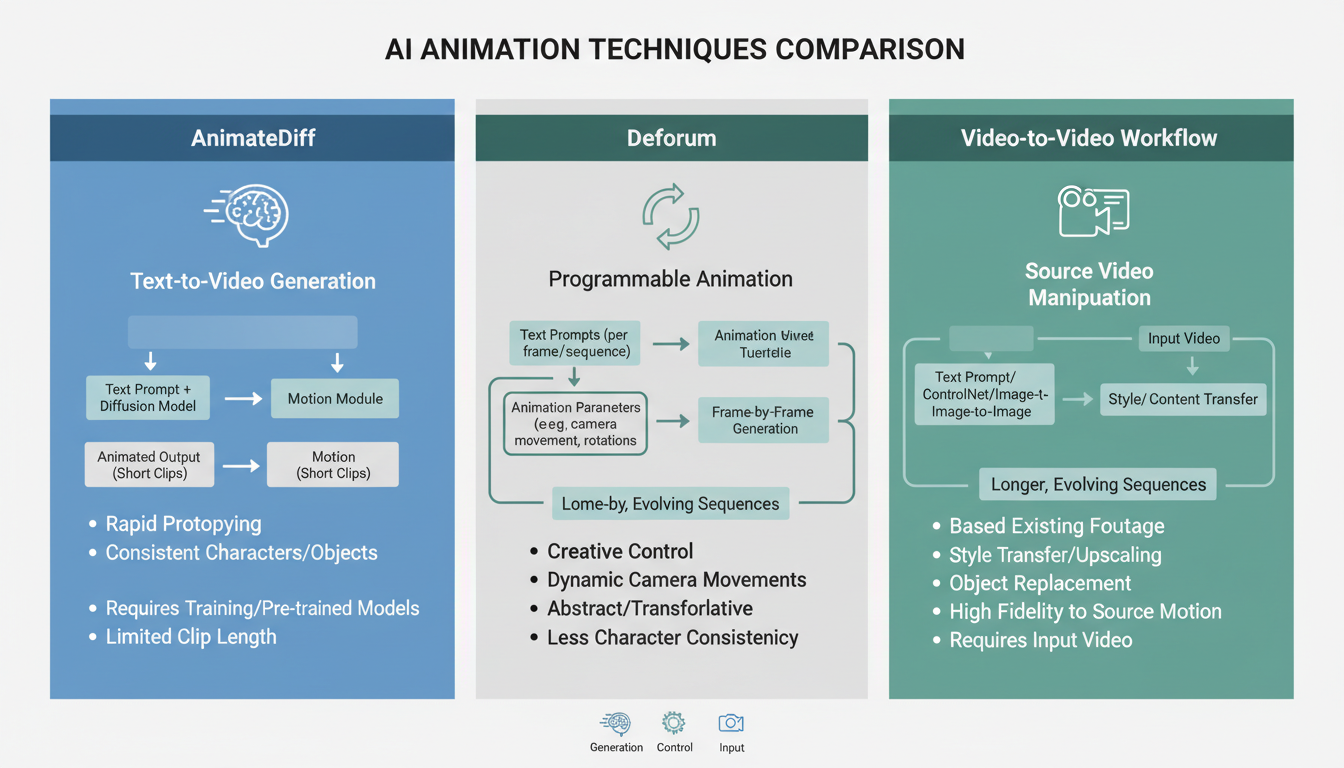 Different approaches to SD animation each have their strengths and ideal use cases
Before exploring techniques, let's map the landscape. There are several distinct approaches to SD animation:
1. AnimateDiff (My Go-To)
AnimateDiff adds temporal attention layers to Stable Diffusion. Instead of generating single images, it generates sequences that flow together. This is currently the most accessible and reliable approach.
Best for: Short clips (2-15 seconds), character animations, looping GIFs
2. Deforum Extension
Deforum creates animation through camera movements and prompt interpolation. It takes a single image or prompt and applies 2D/3D transformations across frames.
Best for: Abstract visuals, music videos, trippy effects, camera movements
3. Video-to-Video
Transform existing video footage frame by frame. The AI redraws each frame while maintaining the motion from the original.
Best for: Style transfer, rotoscoping effects, transforming live action
4. Frame Interpolation
Generate keyframes with SD, then use AI interpolation (like FILM or RIFE) to create smooth transitions between them.
Best for: Longer sequences, reducing generation time, fixing choppy output
5. Newer Models (Wan 2.2, SVD)
Wan 2.2 and Stable Video Diffusion are purpose-built for video. They're not extensions to image models but native video generators.
Best for: When you need the absolute best quality and have the hardware
Getting Started With AnimateDiff
AnimateDiff changed everything for me. Before it existed, SD animation meant fighting frame-to-frame consistency constantly. Now that fight is largely won.
Basic Setup
In ComfyUI (which I recommend for animation work), AnimateDiff setup requires:
- Motion modules (the temporal attention weights)
- A compatible checkpoint (SD 1.5 based works best)
- The AnimateDiff Evolved node pack
In A1111, install the sd-webui-animatediff extension. It's more limited than ComfyUI but easier for beginners.
Your First Animation
Start simple. Seriously. My first attempts were ambitious multi-scene epics that failed spectacularly. Begin with:
Prompt: "A butterfly flying through a sunny meadow, gentle breeze, soft lighting, nature documentary style"

Settings:
- Frames: 16
- FPS: 8
- Motion module: mm_sd_v15_v2
- CFG: 7
- Steps: 20
This generates a 2-second loop. Examine the result. Is the motion smooth? Does the butterfly stay consistent? Does the background flicker? Learning to diagnose problems from short tests saves hours of frustration.
The Secret Sauce: Motion Modules
Not all motion modules are created equal. I've tested dozens, and here's my honest breakdown:
mm_sd_v15_v2: The default, works for most cases. Reliable but not exciting.
mm_sd_v14: Older, more chaotic motion. Good for abstract work.
Temporaldiff-v1-animatediff: Better for subtle movements and talking heads.
HotShot-XL: For SDXL models. Heavier but higher quality.
The motion module defines how frames relate to each other. Choosing the wrong one leads to either frozen-looking output or chaotic, unpredictable movement.
Solving the Flickering Problem
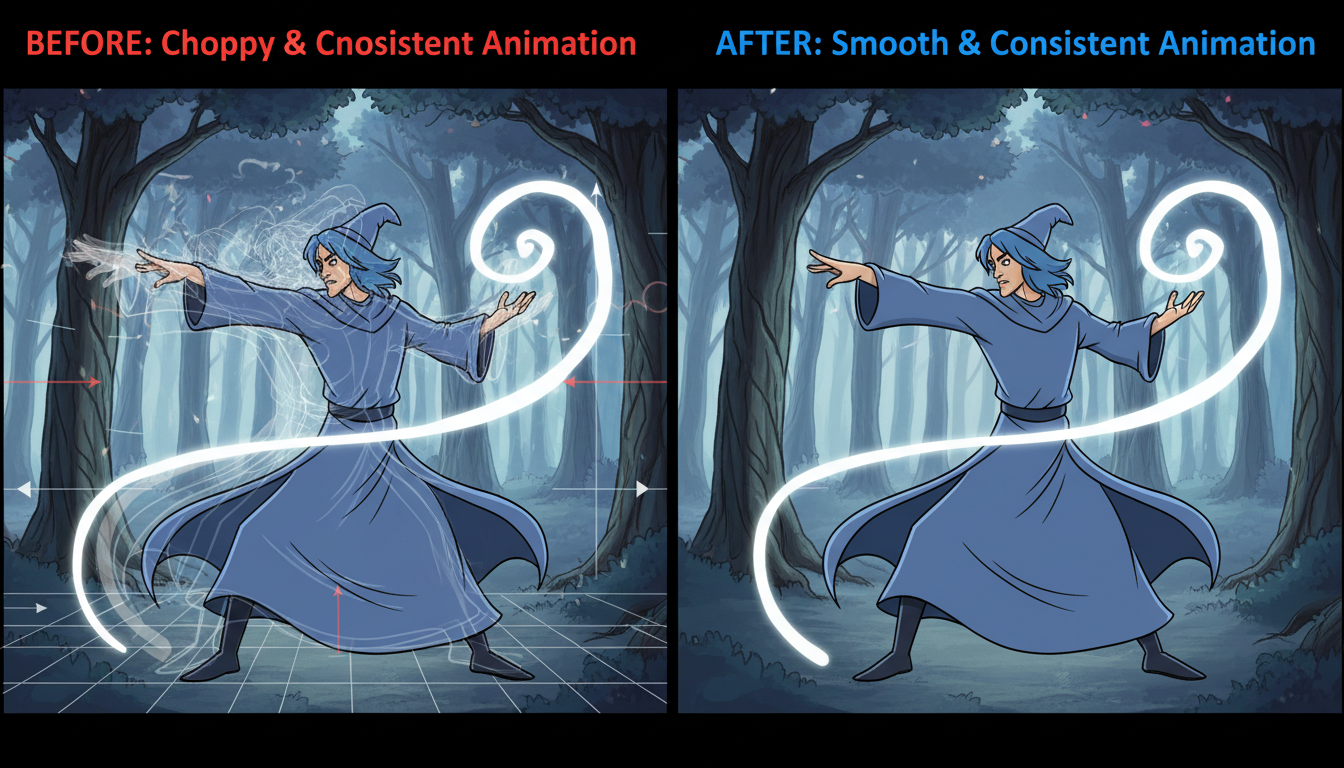 Left: Flickering frames with inconsistent elements. Right: Smooth consistent animation after proper settings
Here's what nobody tells you when you start: your first animations will flicker. Every single one. It's the initiation ritual of AI animation.
Flickering happens because each frame is generated somewhat independently. Even with temporal attention, subtle differences accumulate and become visible as visual noise.
Proven Anti-Flickering Techniques
1. Lower your CFG scale
High CFG (12+) creates sharper images but more flickering. For animation, I stay between 6-8. The softer guidance produces smoother transitions.
2. Use ControlNet consistently
Applying the same ControlNet across all frames anchors elements in place. Depth or OpenPose controls work particularly well for characters.
3. Enable soft temporal consistency
Free ComfyUI Workflows
Find free, open-source ComfyUI workflows for techniques in this article. Open source is strong.
Some motion modules have built-in consistency settings. Crank these up. They smooth adjacent frames at the cost of some responsiveness.
4. Post-process with deflicker tools
After generation, tools like Topaz Video AI or DaVinci Resolve's deflicker filter can clean up remaining issues. Not ideal but effective.
5. Multiple ControlNets
I often use 3+ ControlNets simultaneously: depth for structure, canny for edges, and OpenPose for character poses. More anchoring = less drift.
Advanced Technique: Prompt Travel
Prompt travel means changing your prompt during the animation. The character walks from a forest into a city. The weather shifts from sunny to stormy. This creates narrative within your animations.
In AnimateDiff with ComfyUI, prompt travel uses a specific syntax:
Frame 0-16: "A warrior standing in a peaceful meadow, morning light"
Frame 17-32: "A warrior drawing their sword, storm clouds gathering"
Frame 33-48: "A warrior in combat stance, dramatic lightning, epic battle"
The model interpolates between these prompts, creating smooth transitions. It's almost magical when it works well.
Common Prompt Travel Mistakes
I've made all of these:
Changing too much too fast: Prompt travel needs gradual transitions. Jumping from "cat" to "dog" in 4 frames produces nightmare fuel.
Conflicting elements: If Frame 1 says "blue dress" and Frame 20 says "red dress," you'll get flickering color changes, not a smooth transition.
Forgetting consistent elements: Keep character descriptions identical across all prompts. Only change what needs to change.
Video-to-Video Workflows
Sometimes you have existing footage that you want to transform. Maybe live action you want to stylize, or a rough animation you want to beautify. Video-to-video handles this.
The basic workflow:
- Extract frames from source video
- Process each frame through SD with consistent settings
- Use ControlNet (usually depth or canny) to maintain structure
- Reassemble processed frames into video
The Denoise Strength Trap
Denoise strength controls how much the AI changes each frame. This setting is crucial.
Too low (0.2-0.3): Barely changes anything, just adds noise Too high (0.8-1.0): Loses all connection to source, creates flickering Sweet spot (0.4-0.6): Transforms while maintaining structure
Want to skip the complexity? Apatero gives you professional AI results instantly with no technical setup required.
I usually start at 0.45 and adjust based on results. More stylization needs higher denoise. More fidelity needs lower.
Multi-ControlNet Video-to-Video
The advanced ControlNet techniques really shine in video work. My typical stack:
- Depth (weight 0.7): Maintains spatial relationships
- Canny (weight 0.5): Preserves important edges
- OpenPose (weight 0.8): Keeps characters positioned correctly
This stack reduces flickering dramatically. The overlapping guidance creates reliable frame-to-frame consistency.
Speeding Things Up: LCM LoRA
AnimateDiff is slow. Generating 48 frames at standard settings takes forever. This is where LCM (Latent Consistency Models) LoRA becomes essential.
LCM LoRA reduces the required steps from 20-30 down to 4-8. Generation time drops by roughly 70%. The quality difference is minimal for most use cases.
LCM Settings That Work
Steps: 6
CFG: 1.5-2.0  # Yes, much lower than normal
Sampler: LCM
The dramatically lower CFG is intentional. LCM works differently from standard sampling and produces artifacts at higher values.
I use LCM for previewing and iteration, then generate final output with standard settings for maximum quality. Saves massive time during development.
Deforum: Different Beast Entirely
Deforum doesn't generate frames like AnimateDiff. Instead, it takes an image and applies transformations: zoom, pan, rotate, 3D movement. Each transformed frame gets "touched up" by Stable Diffusion to maintain quality.
This creates a distinctive look. Objects morph and flow rather than move naturally. It's less realistic but incredibly stylish for the right applications.
Deforum Settings That Matter
Motion parameters:
- Translation (x, y, z): Camera movement
- Rotation: Camera rotation
- Zoom: Scaling factor
Coherence settings:
- Color coherence: Prevents color drift
- Cadence: How often to fully regenerate vs transform
Strength:
- How much SD influences each frame
- Lower = more stable, higher = more creative
I primarily use Deforum for music videos and abstract visuals. The dreamlike morphing suits those contexts. For character animation or narrative content, AnimateDiff works better.
Real-World Animation Pipeline
Let me walk you through how I actually produce animation content:
1. Concept and Keyframes
I start by generating static keyframes. What should the beginning look like? The end? Any important middle moments? I use standard SD generation for this, refining prompts until I have strong keyframes.
2. Animation Tests
Short 16-frame tests with AnimateDiff. I'm checking:
Earn Up To $1,250+/Month Creating Content
Join our exclusive creator affiliate program. Get paid per viral video based on performance. Create content in your style with full creative freedom.
- Does the motion feel right?
- Are the prompts producing consistent characters?
- Which motion module works best for this content?
I might generate 10-20 test clips before finding the right combination.
3. Full Generation
Once settings are locked, I generate longer sequences. Usually 48-96 frames at a time. Longer sequences risk accumulated drift, so I break longer animations into segments.
4. Frame Interpolation
If the motion is slightly choppy, I run RIFE interpolation to double or quadruple the frame count. This smooths things considerably with minimal artifacts.
5. Post-Processing
In DaVinci Resolve:
- Color grading for consistency
- Deflicker if needed
- Speed adjustments
- Audio sync
The post-processing often takes as long as generation. Don't skip it.
Hardware Considerations
Animation is compute-intensive. Here's what I've found:
Minimum (frustrating but functional):
- RTX 3060 12GB
- 32GB RAM
- Generation time: ~60s per 16-frame batch
Recommended:
- RTX 3080 or better
- 32GB+ RAM
- Generation time: ~30s per 16-frame batch
Ideal:
- RTX 4090 or dual 4080s
- 64GB RAM
- Generation time: ~10-15s per 16-frame batch
VRAM matters most. 12GB is minimum for comfortable animation work. 24GB lets you run SDXL-based animation without compromise.
For those with limited hardware, cloud options exist. Platforms like Apatero.com offer animation capabilities without local GPU requirements. I've used it for testing workflows before running final production locally.
Common Mistakes and How I Fixed Them
Mistake 1: Generating at Too High Resolution
I tried generating 1080p animations directly. Bad idea. Generation time explodes and quality isn't noticeably better than upscaling.
Fix: Generate at 512x512 or 768x512, then upscale with Real-ESRGAN or similar. Faster and equally good final results.
Mistake 2: Ignoring Frame Rate
Generating 16 frames and playing at 30fps produces 0.5 seconds of video. That's nothing. I used to generate too few frames and wonder why animations felt abrupt.
Fix: Calculate ahead. For 5 seconds at 24fps, you need 120 frames. Budget generation time accordingly.
Mistake 3: Fighting the Medium
Early on, I tried forcing SD to produce Pixar-like animation. It doesn't want to do that. It has its own aesthetic.
Fix: Embrace what SD does well. Painterly styles, dreamlike quality, certain art movements. Work with the medium, not against it.
Mistake 4: No Batch Testing
I'd spend hours generating a long sequence only to find the settings were wrong. Frustrating and wasteful.
Fix: Always test with short batches first. 16 frames tells you everything you need to know about whether settings will work.
Future-Looking: Where AI Animation Is Heading
Here's my prediction: dedicated video models will dominate within a year. AnimateDiff and Deforum are bridges. They're amazing bridges, but bridges nonetheless.
Wan 2.2, Stable Video Diffusion, and upcoming models are designed for video from the ground up. They handle consistency better, produce higher quality motion, and scale to longer durations naturally.
That said, I still recommend learning AnimateDiff now. The concepts transfer. Understanding frame-to-frame consistency, prompt engineering for sequences, and post-processing workflows will remain relevant regardless of model.
Frequently Asked Questions
What's the easiest way to start with SD animation?
AnimateDiff in A1111. Install the extension, load a motion module, and generate your first 16-frame animation. The learning curve is gentler than ComfyUI but capabilities are more limited.
How long can animations be?
Technically unlimited if you generate in segments. Practically, 15-30 seconds is common for AI-generated clips. Longer requires careful planning to maintain consistency across segments.
Why do my characters keep changing appearance?
Likely insufficient ControlNet guidance. Add OpenPose for pose consistency and depth for spatial consistency. Also ensure your prompts describe the character identically in every frame.
Can I use AnimateDiff with SDXL?
Yes, with HotShot-XL motion modules. It's heavier and slower but produces higher quality. I recommend starting with SD1.5-based animation to learn, then moving to SDXL.
How do I add audio to animations?
SD doesn't generate audio. Use separate tools like Runway ML or Eleven Labs for speech, Stable Audio for music, and assemble in video editing software.
What's the difference between AnimateDiff and Deforum?
AnimateDiff generates sequences with temporal attention. Deforum transforms single images with camera movements. AnimateDiff is better for character animation, Deforum for abstract or dreamlike effects.
Can I use reference videos for animation?
Yes! Video-to-video workflows or ControlNet with extracted poses/depth from reference footage work excellently. This is great for dance animations or precise movement replication.
How much VRAM do I need?
12GB minimum for comfortable work. 24GB recommended. 8GB is possible with aggressive optimization but frustrating.
Is AI animation good enough for professional work?
Increasingly yes. Music videos, social media content, and certain commercial applications are already using AI animation. Quality continues improving rapidly.
How do I fix specific flickering elements (like eyes)?
Inpainting. Generate your animation, identify problematic frames, mask the flickering elements, and regenerate just those areas with higher consistency settings.
Wrapping Up
Learning SD animation takes time. My first month of attempts was rough. By month three, I was producing content I was genuinely proud of. The technology rewards persistence.
The key insight that transformed my work: animation is about solving consistency, not about generation quality. A slightly lower quality but perfectly consistent animation looks professional. A beautifully generated but flickering mess looks amateur.
Focus on consistency first. Use multiple ControlNets. Test with short clips. Embrace the aesthetic. And most importantly, keep experimenting.
The tools are here. The techniques are established. The only question is what story you'll tell with them.
Make AI images and video in your browser
Characters, video, photo packs. No GPU, no setup. Your first generation is free.