How to Use Seedance 2.0: Complete Tutorial for AI Video Creation (2026)
Step-by-step tutorial on using Seedance 2.0 for AI video generation. From account setup to multi-modal inputs, camera controls, and pro tips from real testing.
Make AI images and video in your browser
Characters, video, photo packs. No GPU, no setup. Your first generation is free.
I burned through about 200 credits in my first hour with Seedance 2.0. Not because I was being reckless, but because I didn't know what I was doing. I kept generating 15-second clips when I should've been testing at 5 seconds. I was writing essay-length prompts when the model actually works better with shorter ones. And I completely ignored the reference image system that turns out to be the single most powerful feature in the whole platform.
So let me save you that learning curve. This is the tutorial I wish I had when I first opened Dreamina.
Quick Answer: To use Seedance 2.0, access it through Dreamina (dreamina.capcut.com), create a Douyin account or use international access, then use the multi-modal input system to combine text prompts with up to 9 reference images, 3 videos, and 3 audio files. Start with 5-second test generations to save credits before committing to full 15-second clips.
- Seedance 2.0 lives on the Dreamina platform, not as a standalone app
- The @ reference system lets you tag specific uploaded elements in your prompts
- Always test at 5 seconds first (around 30-35 credits) before generating longer clips
- Multi-modal inputs (images + video + audio together) produce the best results
- Camera controls like orbit, push, pull, and tracking add cinematic quality
- Single-frame mode (first + last frame) gives you the most control over output
- Monthly membership runs about $9.60 (69 RMB), making it one of the cheapest options available
If you haven't read the overview yet, check out my complete Seedance 2.0 guide for benchmarks and comparisons against other generators. This article is purely about how to actually use the thing.
What Do You Need to Get Started with Seedance 2.0?
Before you even think about generating your first video, let's get the prerequisites sorted. This tripped me up initially because the platform isn't as straightforward to access as something like Runway or Pika.
Here's what you need ready to go.
Account requirements:
- A Douyin account (ByteDance's Chinese platform) OR international access through the Dreamina portal
- A web browser (Chrome works best in my testing, Firefox had some UI glitches)
- Credits. You'll get some free ones to start, but plan on spending the $9.60/month membership pretty quickly
For the best experience:
- A stable internet connection. Uploads can be chunky, especially with multiple reference images
- Your reference images organized in a folder before you start. Trust me on this one. I wasted 20 minutes my first session just hunting through my Downloads folder for the right images
- A basic understanding of what you want to create. Seedance is powerful but it's not a mind reader
Optional but helpful:
- The Xiaoyunque app if you want to try the free trial first
- A VPN if you're accessing from certain regions
- Reference videos from other AI generators for comparison. I keep a folder of Kling and Runway outputs to benchmark against
One thing I want to be upfront about. The interface is primarily in Chinese with partial English translation. It's getting better, but if you've only ever used English-first platforms, there's a small adjustment period. The icons and layout are intuitive enough that you'll figure it out within 10 minutes though.
How Do You Access Seedance 2.0 on Dreamina?
This is where most tutorials fail you. They say "go to Dreamina" and leave it at that. Let me walk you through the actual process step by step.
Step 1: Navigate to the platform. Open your browser and go to dreamina.capcut.com. This is the official home for Seedance 2.0. Don't Google "Seedance download" because it's a web-based tool, not a desktop application.
Step 2: Create or log into your account. You'll see login options. If you have an existing Douyin account, use that. If not, you can create one. International users can sometimes access through the CapCut ecosystem since ByteDance owns both. The signup process takes about 2 minutes.
Step 3: Find the video generation section. Once you're in the Dreamina dashboard, look for the video generation tool. It's not buried. It should be prominently featured since Seedance 2.0 is their flagship feature right now. You'll see options for image generation too, but we're here for video.
Step 4: Check your credit balance. Before you start generating anything, look at your credit count in the top right area of the interface. New accounts get a starter amount. The monthly membership at 69 RMB (roughly $9.60) gives you a solid credit pool. For reference, a 5-second test generation costs about 30-35 credits. A full 15-second clip costs significantly more.
Step 5: Familiarize yourself with the interface. You'll see an input area where you can type prompts and upload media. Below that, you'll find settings for resolution, duration, and aspect ratio. Take 5 minutes to just click around before generating anything. I know that sounds boring, but it prevents the "where is that setting?" panic mid-workflow.
Honestly, the hardest part of the whole process is the initial account setup. Once you're in, the actual generation workflow is surprisingly smooth.
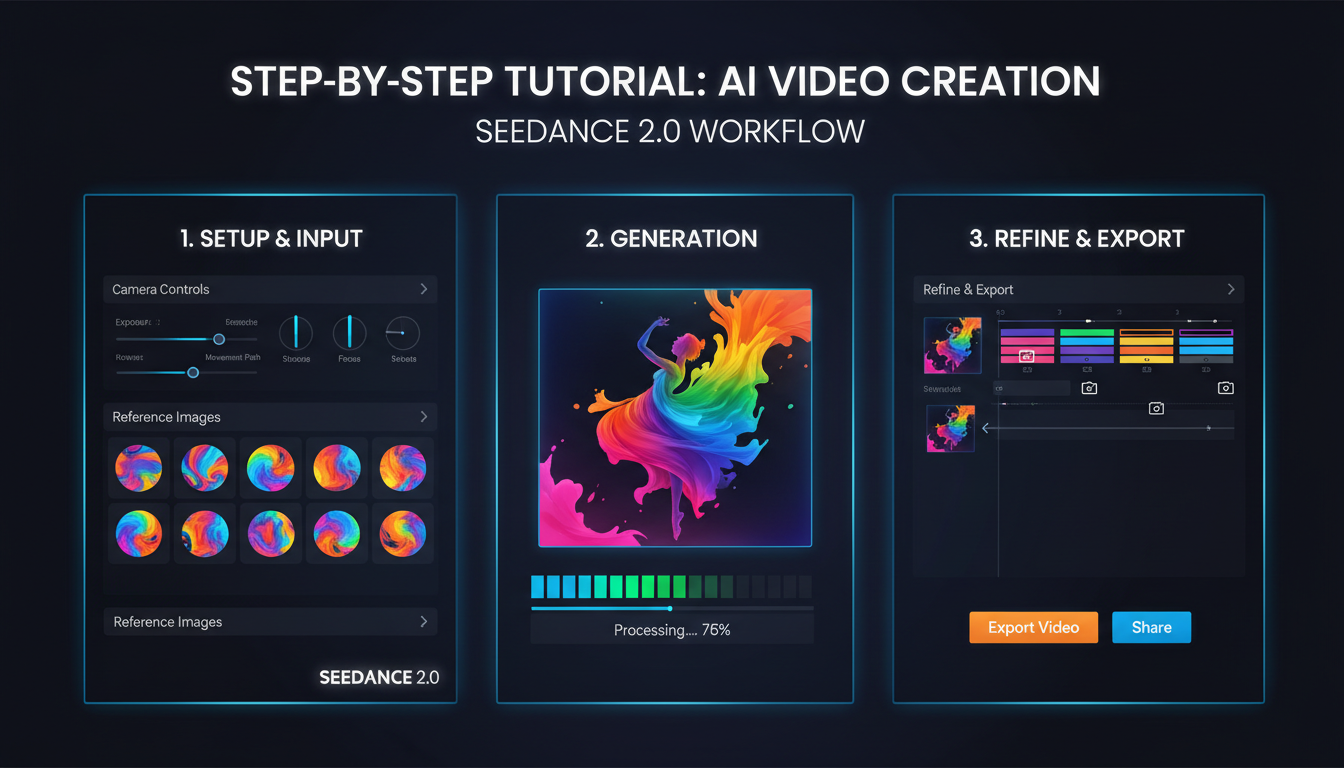
Your First Video. How Does Text-to-Video Work in Seedance 2.0?
Let's start with the simplest workflow. Pure text-to-video. No reference images, no audio, just you and a prompt.
Here's the thing about Seedance 2.0 prompts. They work differently than what you might be used to from Midjourney or DALL-E. Shorter is genuinely better here, especially once you start using reference images (which we'll get to). But even for pure text-to-video, concise prompts outperform essays.
Basic text-to-video workflow:
- In the prompt box, type a clear, specific description. Something like "A woman walking through a sunlit forest path, autumn leaves falling, cinematic lighting, slow motion"
- Set your duration to 5 seconds. I cannot stress this enough. Test at 5 seconds first. Always.
- Choose your aspect ratio. 16:9 for landscape, 9:16 for vertical (TikTok/Reels), 1:1 for square
- Set resolution. Start at 720p for tests, bump to 1080p or 2K for finals
- Hit generate
Your first generation will probably take 30-60 seconds depending on server load. When it comes back, you'll notice something immediately. The motion quality is noticeably natural. This is what ByteDance has been optimizing for, and it shows.
What makes a good Seedance prompt:
- Focus on describing the scene and movement, not artistic style keywords
- Include camera direction if you want specific framing ("close-up," "wide shot," "tracking shot")
- Mention lighting conditions. Seedance handles lighting beautifully
- Keep it under 50 words for pure text generations
What makes a bad prompt:
- Dumping every keyword you can think of ("4k, ultra HD, masterpiece, award-winning, photorealistic, 8k, cinematic, professional")
- Contradictory instructions ("fast action, slow motion, static camera, dynamic movement")
- Vague descriptions ("make something cool with a person")
I remember my very first text-to-video test. I wrote this absurdly long prompt, something like 150 words describing every tiny detail of a beach scene. The result was actually worse than when I shortened it to "waves crashing on a rocky beach at sunset, golden hour, aerial drone shot." The model needs room to interpret. Give it direction, not a screenplay.
After a few text-only tests, you'll start to see both the strengths and limitations. Seedance handles natural movements, human motion, and environmental effects exceptionally well. It struggles more with very specific poses or complex multi-person interactions from text alone. That's where reference images come in.
How Do Image References Improve Your Seedance 2.0 Results?
This is where Seedance 2.0 really starts to separate itself from the competition. The reference image system isn't just "upload a picture and animate it." It's a sophisticated multi-image input system that lets you control your output in ways that text alone never could.
Single image reference (the basics):
- Click the image upload area in the input section
- Upload one reference image
- Write a short prompt describing the motion you want. Something like "slowly turns head to the right and smiles"
- Set duration to 5 seconds for your test
- Generate
The result will use your reference image as the starting frame and animate from there. This alone is powerful, but it gets so much better.
Using the Single-Frame Mode (first + last frame):
This is my favorite technique and I think it's the most underrated feature in the platform. You can upload a first frame AND a last frame, and Seedance will generate the motion between them.
- Upload your starting frame image
- Upload your ending frame image
- The prompt here should focus purely on the transition and motion style
- Generate
I used this to create a product showcase where the camera starts on a close-up and ends on a wide shot. Instead of hoping the AI would figure out a camera pull, I just gave it the two frames and it nailed the transition. Every single time. No rerolls needed.
Multiframes Mode (the real power):
Here's where things get interesting. Seedance 2.0 lets you upload up to 9 reference images at once. Nine. And each one can serve a different purpose.
Think about it this way. You can upload a character reference, a background reference, a lighting reference, a pose reference, and a style reference, all in one generation. The model cross-references all of them to build your output.
My workflow for multi-image reference:
- Upload 2-3 character reference images (different angles help)
- Upload 1-2 environment/background references
- Upload 1 lighting/mood reference
- Write a minimal prompt focusing on action and camera movement
- Use the @ system (which I'll explain next) to tell Seedance which image is which
The consistency you get from multi-image references is legitimately impressive. I ran a series of 10 clips using the same character references and the face consistency stayed solid throughout. That's something I couldn't reliably achieve with other AI video generators until recently.
Hot take time. I think reference images are more important than your text prompt in Seedance 2.0. If I had to choose between a perfect prompt with no references or a mediocre prompt with great references, I'd take the references every single time. The visual information gives the model so much more to work with than words ever could.
Free ComfyUI Workflows
Find free, open-source ComfyUI workflows for techniques in this article. Open source is strong.
How Does the @ Reference System Work?
The @ reference system is the pro technique that separates casual users from people who consistently get great results. If you're serious about using Seedance 2.0, this is the feature you need to master.
When you upload multiple images, Seedance assigns each one a reference tag. You can then use the @ symbol in your prompt to specifically call out which reference image should influence which part of your generation.
How it works in practice:
- Upload Image 1 (a person's face). It gets tagged as @image1
- Upload Image 2 (a city background). It gets tagged as @image2
- Upload Image 3 (a reference for camera angle). It gets tagged as @image3
- In your prompt, write something like: "@image1 walks through @image2 setting, camera angle matching @image3, slow tracking shot"
This tells Seedance exactly what each image represents. Without the @ tags, the model has to guess which image serves which purpose. Sometimes it guesses right. Sometimes your background ends up as a face texture. The @ system eliminates that guesswork entirely.
Tips for effective @ usage:
- Be creative about each reference's role. "@image1 as the main character" is better than just "@image1"
- Don't @ tag every single image if some are just general mood references. Let the model interpret those freely
- Combine @ references with action descriptions, not appearance descriptions. The images already handle appearance
- Keep the overall prompt shorter when using @. The images carry the visual information, your text carries the action
I spent an entire afternoon testing this with and without @ tags. The difference in output quality was dramatic. Without tags, maybe 3 out of 10 generations hit what I wanted. With proper @ tagging, that jumped to 7 or 8 out of 10. It's that significant.
This system is what makes Seedance particularly useful for things like turning photos into videos and animating still photos. You're not just animating randomly. You're directing.
What Are the Advanced Multi-Modal Input Options?
Seedance 2.0 doesn't stop at images. You can combine text, images, video clips, and audio files all in a single generation. This multi-modal approach is what makes the platform genuinely unique right now.
Video references (up to 3):
You can upload up to 3 video clips as reference material. This is useful for:
- Providing motion reference (show the AI how you want something to move)
- Style transfer from existing video
- Continuation of a previous clip
When I'm working on a multi-shot sequence, I'll often use the output from my previous generation as a video reference for the next one. This creates visual continuity across clips without having to fight for consistency.
Audio input (up to 3 audio files):
This is the feature that genuinely surprised me. Seedance 2.0 has native audio sync with lip-sync capabilities. You can upload audio and the model will generate video that matches it.
Upload a voiceover, and the generated character will move their lips in sync. Upload music, and you'll get motion that follows the rhythm. It's not perfect every time, but when it works, it's genuinely impressive.
My recommended multi-modal workflow:
For the highest quality output, I combine inputs like this:
- 2-3 reference images for visual consistency
- 1 video clip for motion style reference
- 1 audio file for timing and lip-sync
- A short text prompt tying it all together with @ references
This is the full Seedance experience. And honestly, when you nail a multi-modal generation, the results compete with anything I've seen from any platform. The key is that each input type handles a different dimension of the output. Images handle appearance, video handles motion style, audio handles timing, and text handles the narrative direction.
Want to skip the complexity? Apatero gives you professional AI results instantly with no technical setup required.
Here's another hot take. The audio sync alone makes Seedance worth trying even if you prefer other generators for everything else. I haven't seen lip-sync this natural from any other AI video tool that's accessible at this price point. The expensive studio-grade tools do it, sure. But at $9.60 a month? That's wild.
How Do You Master Camera Controls and Motion?
Camera controls in Seedance 2.0 are more than just presets. They're tools that can completely transform the mood and quality of your output. I've seen people generate identical prompts with different camera settings, and the results look like they came from different platforms entirely.
Available camera movements:
- Push (dolly in). Camera moves toward the subject. Great for dramatic reveals or focusing attention
- Pull (dolly out). Camera moves away from the subject. Perfect for establishing shots or endings
- Pan. Horizontal camera sweep. Left to right or right to left. Good for landscapes and scene transitions
- Orbit. Camera circles around the subject. This one creates the most cinematic feel
- Tracking. Camera follows a moving subject. Essential for action sequences
How to apply camera controls:
- After writing your prompt and uploading references, look for the camera control settings
- Select your primary camera movement
- Adjust the intensity if the option is available (subtle vs dramatic)
- Generate
My camera control tips from real testing:
Don't stack too many camera movements in one clip. I tried combining orbit + push + pan in a single 5-second generation. The result was a nauseating mess that looked like the cinematographer was having a seizure. Pick one primary camera movement per clip. If you need multiple movements, generate separate clips and edit them together.
The orbit control is the most impressive in my testing. There's something about a slow orbit around a subject that immediately elevates any AI video from "cool demo" to "this looks like an actual production." I use orbit in probably 60% of my Seedance generations now.
For vertical content (9:16), push and pull work better than pan. The narrow frame doesn't give pan movements enough horizontal space to look natural. I learned this after generating about 15 terrible panning shots in portrait mode before it clicked.
Tracking shots require a clear subject in motion. If your prompt doesn't describe movement, the tracking camera has nothing to follow and you'll get a weird drifting effect instead. Always pair tracking with creative movement in your prompt. Something like "woman running through rain, tracking shot following from the side."
What Pro Tips Actually Save You Credits?
Credits are real money. Every wasted generation is money down the drain. After burning through my initial balance faster than I'd like to admit, I developed a testing workflow that's saved me a significant amount.
The 5-second rule:
This is the most important tip in this entire article. Generate everything at 5 seconds first. A 5-second test costs roughly 30-35 credits. A 15-second generation costs significantly more. If your 5-second test looks bad, you just saved yourself a massive credit waste. If it looks good, then you generate the full version.
I follow a strict testing protocol now:
- Generate at 5 seconds, 720p first
- If the composition and motion look right, generate at 5 seconds, 1080p
- If the quality holds up, generate the full 15-second version at target resolution
- Only bump to 2K resolution for final, proven compositions
This three-step process means I spend about 100 credits validating a concept before committing 300+ credits to the final version.
Keep prompts concise when using references:
I mentioned this earlier but it deserves emphasis. When you've uploaded reference images, your prompt should be about action and camera movement, not about describing what things look like. The images already handle visual description. Redundant text descriptions can actually confuse the model and produce worse results.
Earn Up To $1,250+/Month Creating Content
Join our exclusive creator affiliate program. Get paid per viral video based on performance. Create content in your style with full creative freedom.
Bad: "@image1 a beautiful woman with long dark hair wearing a red dress standing in @image2 a modern city with tall glass buildings at night with neon lights reflecting off wet streets, cinematic lighting, 4k quality"
Good: "@image1 walks slowly through @image2, glancing up at the lights, tracking shot, night atmosphere"
The second prompt gave me better results literally every time I tested it. Shorter prompts let the reference images do their job.
Other credit-saving tips:
- Save your best generation settings (resolution, aspect ratio, camera control combinations) so you can replicate them
- Use the video editing feature for small tweaks instead of regenerating from scratch
- Template replication lets you apply a proven workflow to new content without rebuilding from zero
- Batch your testing. Do all your 5-second tests in one session, review them, then do your final generations in another session. This prevents the "one more try" spiral that eats credits
If you're using Seedance alongside other platforms like what we offer at Apatero, the credit-saving mindset applies everywhere. Test cheap, iterate fast, finalize once you're confident.
What Are the Most Common Mistakes to Avoid?
I've made every mistake possible with Seedance 2.0 so you don't have to. Here are the ones that cost me the most credits and time.
Mistake 1: Writing novel-length prompts. I already beat this drum, but I keep seeing people in Discord servers sharing 200-word prompts for Seedance. The model was trained differently than text-heavy generators. Shorter prompts with good references outperform long prompts every single time in my testing.
Mistake 2: Ignoring the @ reference system. Uploading 5 images without @ tags is like giving someone a pile of photographs and saying "make a movie." They don't know which photo is the character, which is the location, which is the mood reference. Use @ tags. Always.
Mistake 3: Starting with 15-second, max-resolution generations. Test at 5 seconds. Test at 720p. I can't say this enough. The number of people who blow their entire monthly credits on three 15-second clips that don't look right is heartbreaking. Be disciplined about testing.
Mistake 4: Using contradictory camera controls. Orbit + pan + tracking in one shot doesn't create a "dynamic" video. It creates visual chaos. One camera movement per clip. Combine them in post-production if you need variety.
Mistake 5: Forgetting about aspect ratio for your target platform. I once generated 20 gorgeous 16:9 landscape clips for a TikTok project. Then realized I needed 9:16 vertical. The crops looked terrible. Always set your aspect ratio based on where the content will live before you start generating.
Mistake 6: Not using Single-Frame mode for transitions. If you know your start and end point, Single-Frame mode (uploading first and last frame) gives you predictable, controlled results. It's the closest thing to "directing" the AI and most people skip it entirely.
Mistake 7: Over-relying on text-to-video. Pure text-to-video is the least predictable workflow in Seedance 2.0. The multi-modal system exists for a reason. Even one reference image dramatically improves consistency. I use text-only for quick concept tests and nothing else.
For those working on AI video content at scale, whether through Seedance, Apatero's video generation tools, or other platforms, avoiding these mistakes will save you both time and money across any tool you use.
What About Video Editing Without Regeneration?
One feature that doesn't get enough attention is Seedance 2.0's ability to edit generated videos without doing a full regeneration. This is huge for workflow efficiency.
After generating a clip, you can make targeted adjustments. Maybe the motion in the last 2 seconds gets weird, or the color grading doesn't match your other clips. Instead of spending full credits on a complete redo, you can edit specific portions.
This is still a relatively new feature, so it has limitations. You can't completely change the content or swap out subjects. Think of it more like fine-tuning rather than overhauling. But for those last-mile adjustments that take a good clip and make it great, it's invaluable.
I've used it most for fixing motion artifacts at the end of clips. There's a common issue with all AI video generators where the last second or two can degrade. Being able to touch that up without regenerating the entire clip has saved me dozens of credits per session.
How Does Template Replication Work?
Template replication is the feature power users live in. Once you've dialed in settings that produce great results, you can save that entire configuration as a template. Then apply it to new content with a single click.
Think of it as presets for video generation. Your prompt structure, camera controls, resolution settings, aspect ratio, duration preferences, all saved and reusable.
My template library currently has about 12 saved configurations:
- Cinematic portrait (orbit, 16:9, 1080p, 10s)
- TikTok talking head (static, 9:16, 720p, 15s)
- Product showcase (push, 1:1, 1080p, 5s)
- Landscape establishing shot (pan, 16:9, 2K, 10s)
When a new project comes in, I pick the closest template and adjust from there instead of starting from scratch. It's a small thing, but it adds up to significant time savings over dozens of generations.
Frequently Asked Questions
Is Seedance 2.0 free to use? There's a free trial available through the Xiaoyunque app, and new Dreamina accounts get starter credits. For regular use, the monthly membership costs about $9.60 (69 RMB). Given what you get, this is genuinely one of the most affordable AI video generation options available.
Can I use Seedance 2.0 in English? The interface is partially translated to English, but some elements remain in Chinese. The workflow is intuitive enough that language isn't a major barrier once you know where the controls are. This tutorial covers the layout, so you should be fine.
What resolution does Seedance 2.0 support? Resolutions range from 720p up to 1080p (2K). For testing, 720p is sufficient. For final output, 1080p or 2K produces clean, sharp results. Start lower to save credits and only render at max resolution for final versions.
How long can Seedance 2.0 videos be? Videos range from 4 to 15 seconds per generation. I recommend starting at 5 seconds for all tests. You can combine multiple clips in a video editor for longer sequences.
How many images can I upload as references? Seedance 2.0 supports up to 9 reference images, 3 video references, and 3 audio files in a single generation. Using multiple input types together produces the best results.
What's the @ reference system? The @ system lets you tag specific uploaded images in your prompt. Instead of the AI guessing which image is the character and which is the background, you explicitly assign roles. This dramatically improves output consistency.
How much does each generation cost in credits? A 5-second test generation costs roughly 30-35 credits. Longer durations and higher resolutions cost more. The exact pricing varies by settings, but the 5-second test is your cheapest option for validation.
Is Seedance 2.0 better than Kling or Runway? It depends on your use case. Seedance excels at multi-modal inputs, audio sync, and natural human motion. Kling has better motion dynamics for action scenes. Runway has a more polished English interface. Check our AI video generator comparison for a detailed breakdown.
Can Seedance 2.0 do lip-sync? Yes. Native audio sync with lip-sync is one of Seedance 2.0's standout features. Upload a voiceover as an audio reference and the generated character will move their lips in time. It's not flawless every time, but when it works, the results are remarkably natural.
What aspect ratios are available? Seedance 2.0 supports 16:9 (landscape), 9:16 (vertical/portrait), 4:3, 1:1 (square), and 3:4. Choose based on your target platform before generating.
Wrapping It Up. Is Seedance 2.0 Worth Learning?
Look, I've tested a lot of AI video generators at this point. Kling, Runway, Pika, Sora, Minimax, the open source ones, you name it. Seedance 2.0 isn't the best at everything, and I'm not going to pretend it is. But its multi-modal input system, the @ referencing, and the audio sync capabilities make it uniquely powerful for specific workflows.
If you're creating content that requires character consistency across multiple clips, Seedance's multi-image reference system is the best I've used. If you need lip-sync on a budget, nothing else at this price point comes close. And if you're the type who likes granular control over your generations, the combination of camera controls, frame-by-frame input, and template replication gives you more dials to turn than most competitors.
My honest recommendation is this. Don't try to make Seedance your only tool. Use it alongside platforms like Apatero for image generation and other video tools for the things they do best. The best creators I know use 2-3 different generators depending on the project. Seedance 2.0 absolutely deserves a spot in that rotation.
Start with text-to-video to get comfortable. Move to single-image reference. Then multi-image with @ tags. Then add camera controls. Then bring in audio. Layer the complexity gradually, and within a week you'll be producing clips that genuinely impress people.
The $9.60 monthly cost is basically nothing for what you get. If you're even remotely interested in AI video, give Seedance 2.0 a real shot. Just remember to test at 5 seconds first. Your credit balance will thank you.
Make AI images and video in your browser
Characters, video, photo packs. No GPU, no setup. Your first generation is free.
Related Articles
AI Anime Video Generation: Turn Still Characters Into Animated Content
Complete guide to turning still anime and AI-generated character images into animated video. Covers WAN 2.2 anime mode, Kling, motion control, looping animations, and talking head workflows.
AI Documentary Creation: Generate B-Roll from Script Automatically
Transform documentary production with AI-powered B-roll generation. From script to finished film with Runway Gen-4, Google Veo 3, and automated...
AI Making Movies in 2026: The Current State and What's Actually Possible
Realistic assessment of AI filmmaking in 2026. What's working, what's hype, and how creators are actually using AI tools for video production today.