ComfyUI Inpainting: Advanced Techniques for Smooth Image Editing
Master inpainting in ComfyUI with advanced mask techniques, model selection, and workflow optimization for perfect AI image editing results.
Make AI images and video in your browser
Characters, video, photo packs. No GPU, no setup. Your first generation is free.
Inpainting allows you to selectively regenerate parts of an image while keeping the rest intact. In ComfyUI, inpainting workflows offer precise control over mask creation, model selection, and blending techniques that produce direct results.
This guide covers advanced inpainting techniques beyond basic mask-and-regenerate, showing how to achieve professional-quality edits for character refinement, background replacement, and detail correction.
Quick Answer: Effective ComfyUI inpainting requires proper mask preparation, appropriate model selection (inpainting-specific models work best), and attention to blending. Key techniques include mask feathering, differential diffusion for gradual changes, and multi-pass approaches for complex edits. The SetLatentNoiseMask node is central to most inpainting workflows.
:::tip[Key Takeaways]
- ComfyUI Inpainting: Advanced Techniques for Clean Image Editing represents an important development in its field
- Multiple approaches exist depending on your goals
- Staying informed helps you make better decisions
- Hands-on experience is the best way to learn :::
- Core inpainting workflow setup
- Advanced mask creation techniques
- Model selection and configuration
- Blending and seamlessness tips
- Common use cases and solutions
Understanding Inpainting
Inpainting regenerates masked areas while maintaining coherence with surrounding content. The AI sees both the preserved image and the mask, generating new content that blends naturally.
When to Use Inpainting
Character refinement: Fixing faces, hands, or details.
Object replacement: Changing elements within a scene.
Background modification: Altering or extending backgrounds.
Error correction: Removing artifacts or unwanted elements.
Style matching: Adding elements that match existing aesthetic.
Core Components
Every inpainting workflow needs:
Source image: The image to modify.
Mask: Defines what to regenerate (white) versus preserve (black).
Prompt: Describes desired content in masked area.
Model: Generates the new content.
Basic Inpainting Workflow
Essential Nodes
Set up the foundation:
[Load Image] → Source image
       ↓
[Load Image (Mask)] or [Create Mask]
       ↓
[VAE Encode] → Latent image
       ↓
[SetLatentNoiseMask] ← Combine latent + mask
       ↓
[KSampler] ← Inpaint conditioned generation
       ↓
[VAE Decode]
       ↓
[Save Image]
SetLatentNoiseMask Node
This critical node tells the sampler which areas to regenerate:
Inputs:
- Samples (latent from VAE Encode)
- Mask (from mask image or creation node)
Function: Applies mask to latent, guiding generation.
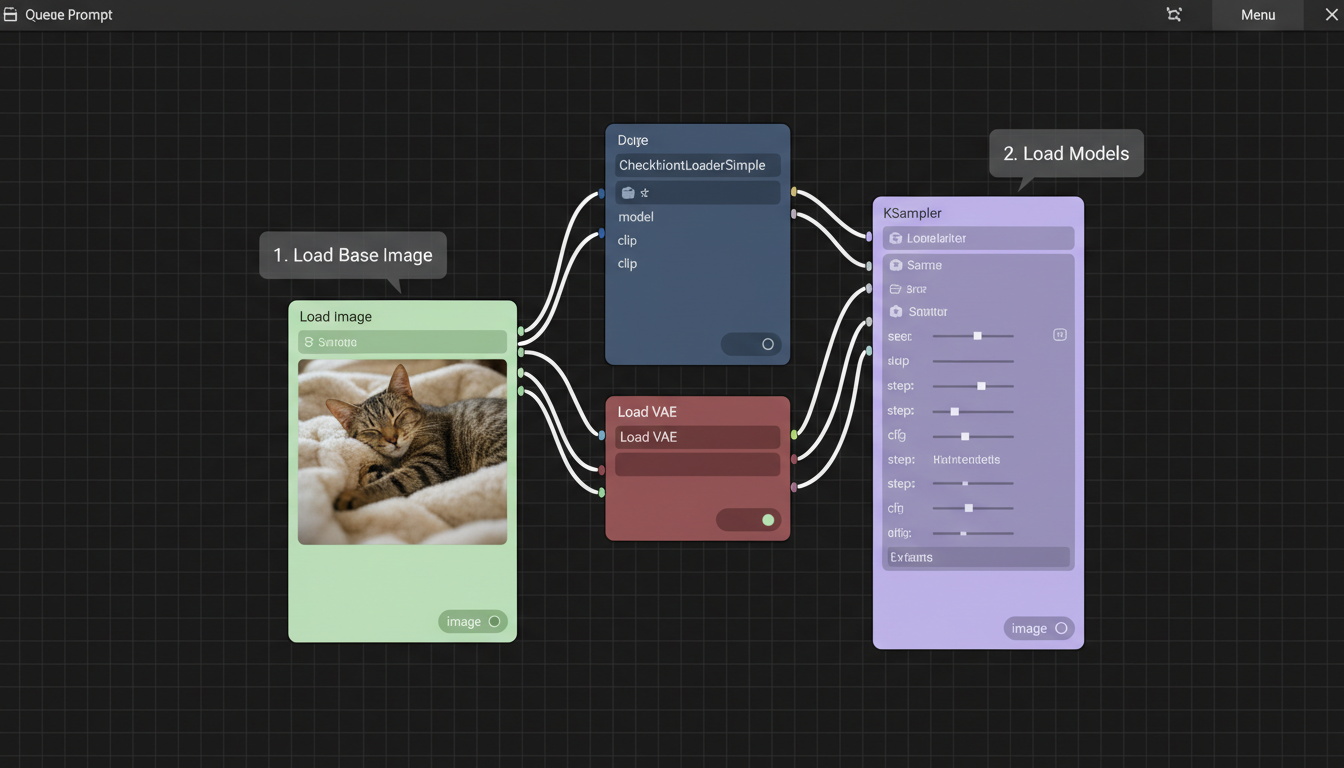 Inpainting mask workflow demonstration in ComfyUI
Prompt Configuration
For inpainting prompts:
Describe the entire image: Not just the masked area.
Focus on replacement content: What should appear in the mask.
Match style: Include style descriptors matching the original.
Advanced Mask Techniques
Mask Feathering
Hard mask edges create visible seams. Feathering helps:
Blur Mask node: Softens edges for gradual blending.
Recommended blur: 3-10 pixels depending on edit size.
Custom gradients: Create manual fade from mask center.
Precision Masking
For detailed work:
SAM (Segment Anything): Automatic object detection and masking.
GroundingDINO: Text-based object selection.
Manual refinement: Paint over auto-detected masks.
Mask Expansion
Sometimes masks need adjustment:
Grow Mask: Expand mask to cover more area.
Use case: Ensuring complete coverage of target element.
Typical expansion: 5-20 pixels beyond visible edge.
Multiple Masks
Complex edits may need layers:
Combine masks: For multiple areas in one pass.
Sequential masking: Different prompts for different areas.
Mask arithmetic: Add, subtract, intersect masks.
Model Selection
Inpainting-Specific Models
Dedicated inpainting models perform better:
Free ComfyUI Workflows
Find free, open-source ComfyUI workflows for techniques in this article. Open source is strong.
SD 1.5 Inpainting: Stable Diffusion 1.5 variant trained for inpainting.
SDXL Inpainting: Higher quality, larger model.
Realistic Vision Inpainting: For photorealistic edits.
These models understand mask contexts better than standard models.
Using Standard Models
Regular models can inpaint with adjustments:
Higher denoise: 0.7-1.0 for significant changes.
Lower denoise: 0.3-0.5 for subtle refinement.
More steps: Compensate for lack of inpaint training.
ControlNet with Inpainting
Combine inpainting with ControlNet:
Preserve structure: Canny or depth maintains composition.
Guide generation: Reference poses or layouts.
Fill complexity: Better results in complex masked areas.
Blending Techniques
Denoise Strength Control
Denoise affects how much original information remains:
High denoise (0.8-1.0): Complete regeneration in mask.
Medium denoise (0.5-0.7): Balanced change with some preservation.
Low denoise (0.2-0.4): Subtle refinement keeping most detail.
Match denoise to edit requirements.
Differential Diffusion
For gradual changes across mask:
Want to skip the complexity? Apatero gives you professional AI results instantly with no technical setup required.
Gradient mask: Varying opacity creates varying change.
Application: Smooth transitions, age progression, style blending.
Setup: Create mask with gray values representing change intensity.
Multi-Pass Inpainting
Complex edits benefit from multiple passes:
Pass 1: Rough content placement.
Pass 2: Refinement with smaller mask.
Pass 3: Edge blending with feathered mask.
Each pass refines the previous result.
Common Use Cases
Face Correction
Fixing facial issues:
Mask creation: Precise face mask with slight expansion.
Prompt focus: Describe correct facial features.
Denoise: 0.4-0.6 for refinement, higher for replacement.
ControlNet: Use face detection for structure preservation.
Hand Repair
Hands are notoriously difficult:
Expanded mask: Cover entire hand generously.
Specific prompt: Describe hand position and action.
Earn Up To $1,250+/Month Creating Content
Join our exclusive creator affiliate program. Get paid per viral video based on performance. Create content in your style with full creative freedom.
High denoise: Hands often need complete regeneration.
Multiple attempts: Generate several and select best.
Background Replacement
Changing scene context:
Object masking: Invert to mask everything except subject.
Large area denoise: 0.7-1.0 for new backgrounds.
Style matching: Prompt must match subject lighting and style.
Edge attention: Feather mask around subject edges.
Object Addition
Adding elements to scenes:
Strategic masking: Where object should appear.
Context prompting: Object plus surrounding context.
Shadow/lighting: Consider how addition affects scene.
Perspective matching: New element must fit perspective.
Workflow Optimization
Batch Processing
For multiple similar edits:
Standardize masks: Create templates for recurring edits.
Batch node: Process multiple images through same workflow.
Consistency: Same settings produce predictable results.
Quality Control
Verify inpainting success:
Edge inspection: Zoom on mask boundaries.
Color matching: Compare inpainted area to surroundings.
Detail consistency: Ensure style matches throughout.
Multiple generations: Generate options and select best.
Iteration Workflow
Refine through cycles:
- Initial inpaint with generous mask
- Evaluate and identify issues
- Smaller targeted inpaint for refinement
- Final pass for edge blending
Troubleshooting
Visible Seams
Cause: Hard mask edges, color mismatch.
Solutions:
- Increase mask feathering
- Lower denoise near edges
- Color correct before inpainting
- Expand mask beyond seam
Inconsistent Style
Cause: Prompt doesn't match original image style.
Solutions:
- Add style descriptors to prompt
- Use same model as original generation
- Lower denoise to preserve more style information
- Use img2img preprocessing
Wrong Content
Cause: Prompt misinterpretation, insufficient guidance.
Solutions:
- More specific prompting
- Add ControlNet for structural guidance
- Negative prompts for unwanted elements
- Multiple generations with selection
Poor Blending
Cause: Lighting/color mismatch between areas.
Solutions:
- Color match preprocessing
- Gradient masks for gradual transition
- Multi-pass with increasingly refined masks
- Post-processing color correction
Frequently Asked Questions
What's the best inpainting model?
SDXL Inpainting for quality, SD 1.5 Inpainting for speed. Match to your base model ecosystem.
How do I create precise masks?
Use SAM or GroundingDINO for automatic detection, then refine manually. External editors work for complex masks.
Why do my inpaints look different from the rest of the image?
Style mismatch. Include style descriptors in prompt, use same model as original, consider lower denoise.
Can I inpaint multiple areas at once?
Yes, combine masks. Be aware that single prompt applies to all areas.
How do I inpaint while preserving exact colors?
Lower denoise, color-match preprocessing, or multi-pass with refinement focus.
What denoise value should I use?
0.7-1.0 for replacement, 0.4-0.6 for refinement, 0.2-0.3 for subtle adjustment.
How do I handle complex edges?
Feathered masks, multiple passes with decreasing mask sizes, and ControlNet for structure.
Can I undo inpainting?
Not directly. Keep original image. Use version control for important edits.
Conclusion
ComfyUI inpainting provides powerful tools for selective image editing when properly configured. Success requires attention to mask quality, appropriate model selection, and careful blending techniques. Master these fundamentals and iterate on complex edits for professional results.
Start with basic workflows, then add complexity as needed. Most edits don't require every advanced technique, but knowing them helps when standard approaches fall short.
For character consistency across inpainting sessions, see our character consistency guide. For basic ComfyUI skills, check our beginner's guide.
Make AI images and video in your browser
Characters, video, photo packs. No GPU, no setup. Your first generation is free.
Related Articles

10 Most Common ComfyUI Beginner Mistakes and How to Fix Them in 2025
Avoid the top 10 ComfyUI beginner pitfalls that frustrate new users. Complete troubleshooting guide with solutions for VRAM errors, model loading...

25 ComfyUI Tips and Tricks That Pro Users Don't Want You to Know in 2025
Discover 25 advanced ComfyUI tips, workflow optimization techniques, and pro-level tricks that expert users use.

360 Anime Spin with Anisora v3.2: Complete Character Rotation Guide ComfyUI 2025
Master 360-degree anime character rotation with Anisora v3.2 in ComfyUI. Learn camera orbit workflows, multi-view consistency, and professional...